Mini Dutch Tool Chest
The Mini Dutch Tool Chest is finally done. I’ve been working on this on and off for over a year and a half. I’m delighted with the finished chest. It puts a smile on my face every time I walk into my workshop and see it perched on the corner of my bench.
The plan to build this chest took shape in my head during a Bench Talk 101 call one night. We were talking about building something to hold a special tool as a group project. I’ve always had it in mind to build a Dutch tool chest, and Megan Fitzpatrick had recently built a tiny block plane sized chest for Quercus Magazine. Shrenik Savla-Shah was working on a mitre plane for me. After getting the measurements for the plane from him. I decided a half sized Dutch tool chest would be the perfect home for it.
I based it on Fitzpatrick’s plans in Fine Woodworking #293. Everything is pretty much half size, with some minor adjustments to make it more convenient for the stock I had to hand. The chest is 11 1/4 inches wide. 13 inches high at the back including the lid. It is 5 1/8th inches deep. The largest design difference would be that I did not put battens on the lid. I did however add a dust seal to the interior of the lid, that does a similar job of stopping the lid from cupping. Having both the seal and the battens would have looked a bit weird to me, so I decided to go without them.
I’ve written a lot about different stages of this project here. Near disasters with nails, getting set up for beading, The initial assembly of the carcass, making the tongue & groove boards, rebating the lid, making the chisel holder and the ordeal of the dust seal.
Now its time to walk through the finished project. Its made of pine from a local big box store. This is probably the only thing I would change if I was going to do the project again. Its miserable stuff, splintery, riddled with knots, very unstable. If I was to start again I’d probably go with something like poplar, or find a better source of pine.
The chest is essentially two boards dovetailed to a base, with a shelf in a rebate in the middle. Get that much done and you have something that is beginning to look like a Dutch tool chest. The shelf is also nailed in from the sides. The back is tongue & groove boards nailed on. The front board is alsonailed on. No one makes half sized nails with decorative heads. Every nail I drove home was an exercise in terror. The nails are only a little thinner than the 3/8th of an inch stock. If you want to nail thin stock, make plenty of practice pieces and take a lot of care with your pilot holes. Only one nail caused any breakout. The nail on the front centre right. I didn’t think through the positioning. It ran into one of the side nails, deflected up and tore out a little bit of the floor of the shelf. I pulled it out, bent it a little just past the head, and drove it again, with the new bent angle it is actually going in at about 45 degrees. I kept the same positioning on the other side. This time I drove the nail in at 45 degrees, pulled it out and did the same trick of bending it so the head sat flush when done.
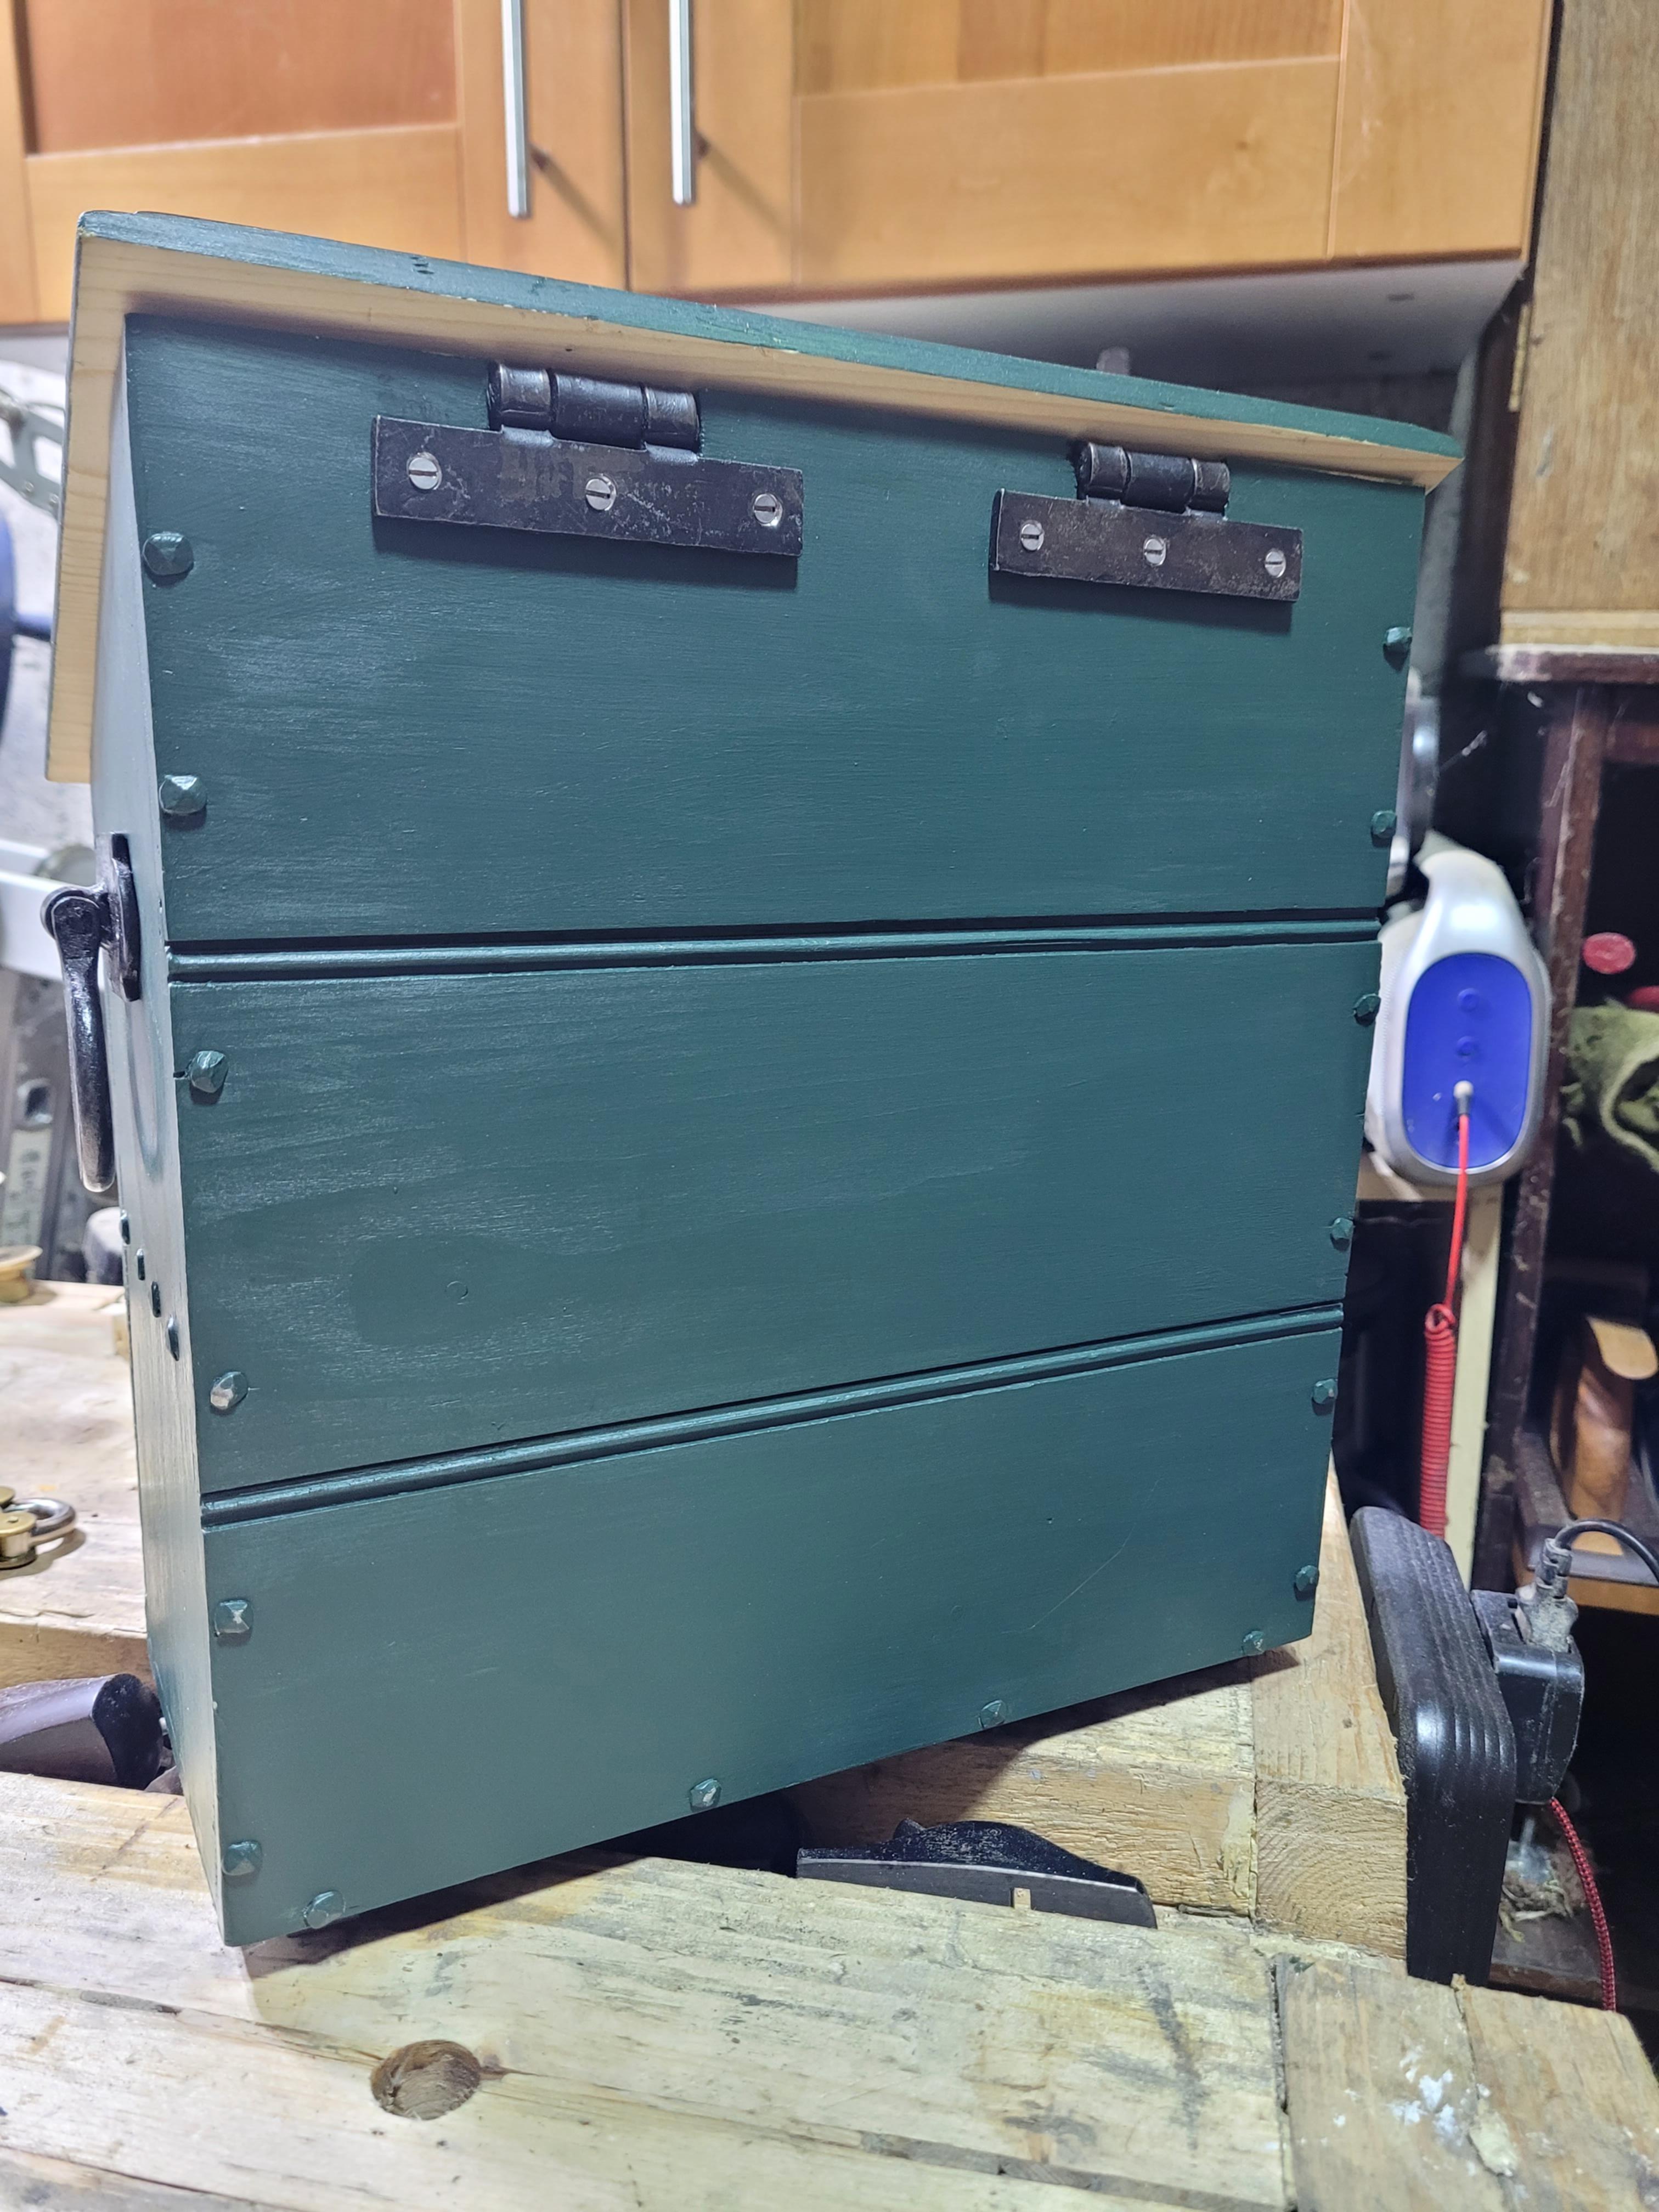
Hardware for a half size chest is a little tricky. I eventually found a vintage set of ring pulls for the side handles on ebay. The hinges and hasp are modern and widely available. The only problem with them is that whatever they are coated with comes off very easily. Its some sort of powdery black paint. It gets on your hands, on the workpiece. Everywhere. Eventually I hit them with clear coat to control it.
The particular hinge I chose is nice in terms of looks and size, but its not easy to inlay. Lots of curves and little bulges where it passes through the back wall. I’d probably try and find something a little simpler to work with if I did it again. The hasp was very simple to put in. Nice straight flat parts.
The paint is Jubilee Racing Green. I had my reasons for choosing British Racing Green as the colour. A tribute to several aspects of my tool collection. Green obviously works for an Irish made chest, but British racing green was first used at a car race in the Phoenix Park in Dublin, Ireland. A lot of the tools I have in the chest are British made this feels fitting. The plane that inspired the creation of this chest is my Savla-Shah mitre plane. So British/Indian in origin. Green is a shared colour between the Irish & Indian flags. Finally, it simply would not do to leave out my American friends. I’m using American Black Walnut for a lot of the tool holders, rot strips, locking mechanism, etc.
The interior of the chest got a very light coat of shellac, as did the various tool holders.
A big part of creating this chest was to create a home for some very nice tools that do not live in my workshop. My shop is unfortunately an ideal breeding ground for rust. I’ve had tools get enough rust to pit within 24 hours when left out. A lot of the tools in this chest are just too nice for that life. Up until now they have lived in the house. While kept safe, that meant they didn’t get used all that much. Now they have a home that should keep them safe in the shop. The upper lid has its dust seal. Less obvious is the dust sealing for the lower compartment. I placed the battens on the lower door at the extreme left and right. This is generally not advised for a Dutch tool chest, as it makes it a little more fiddly to close. I then added an upper and lower strip of wood to provide a seal all the way around. This has to have a slot added to it to allow the locking batten to pass through.
Finally, all of the tools that live in here are special tools to me. First off they had to be relatively small. It is a small chest. After that, its all tools that have either been made explicitly for me or are special gifts. Every tool in the chest was used to make the chest, with the exception of the travisher. Want to see what is in there? Have a gander at the photos below.
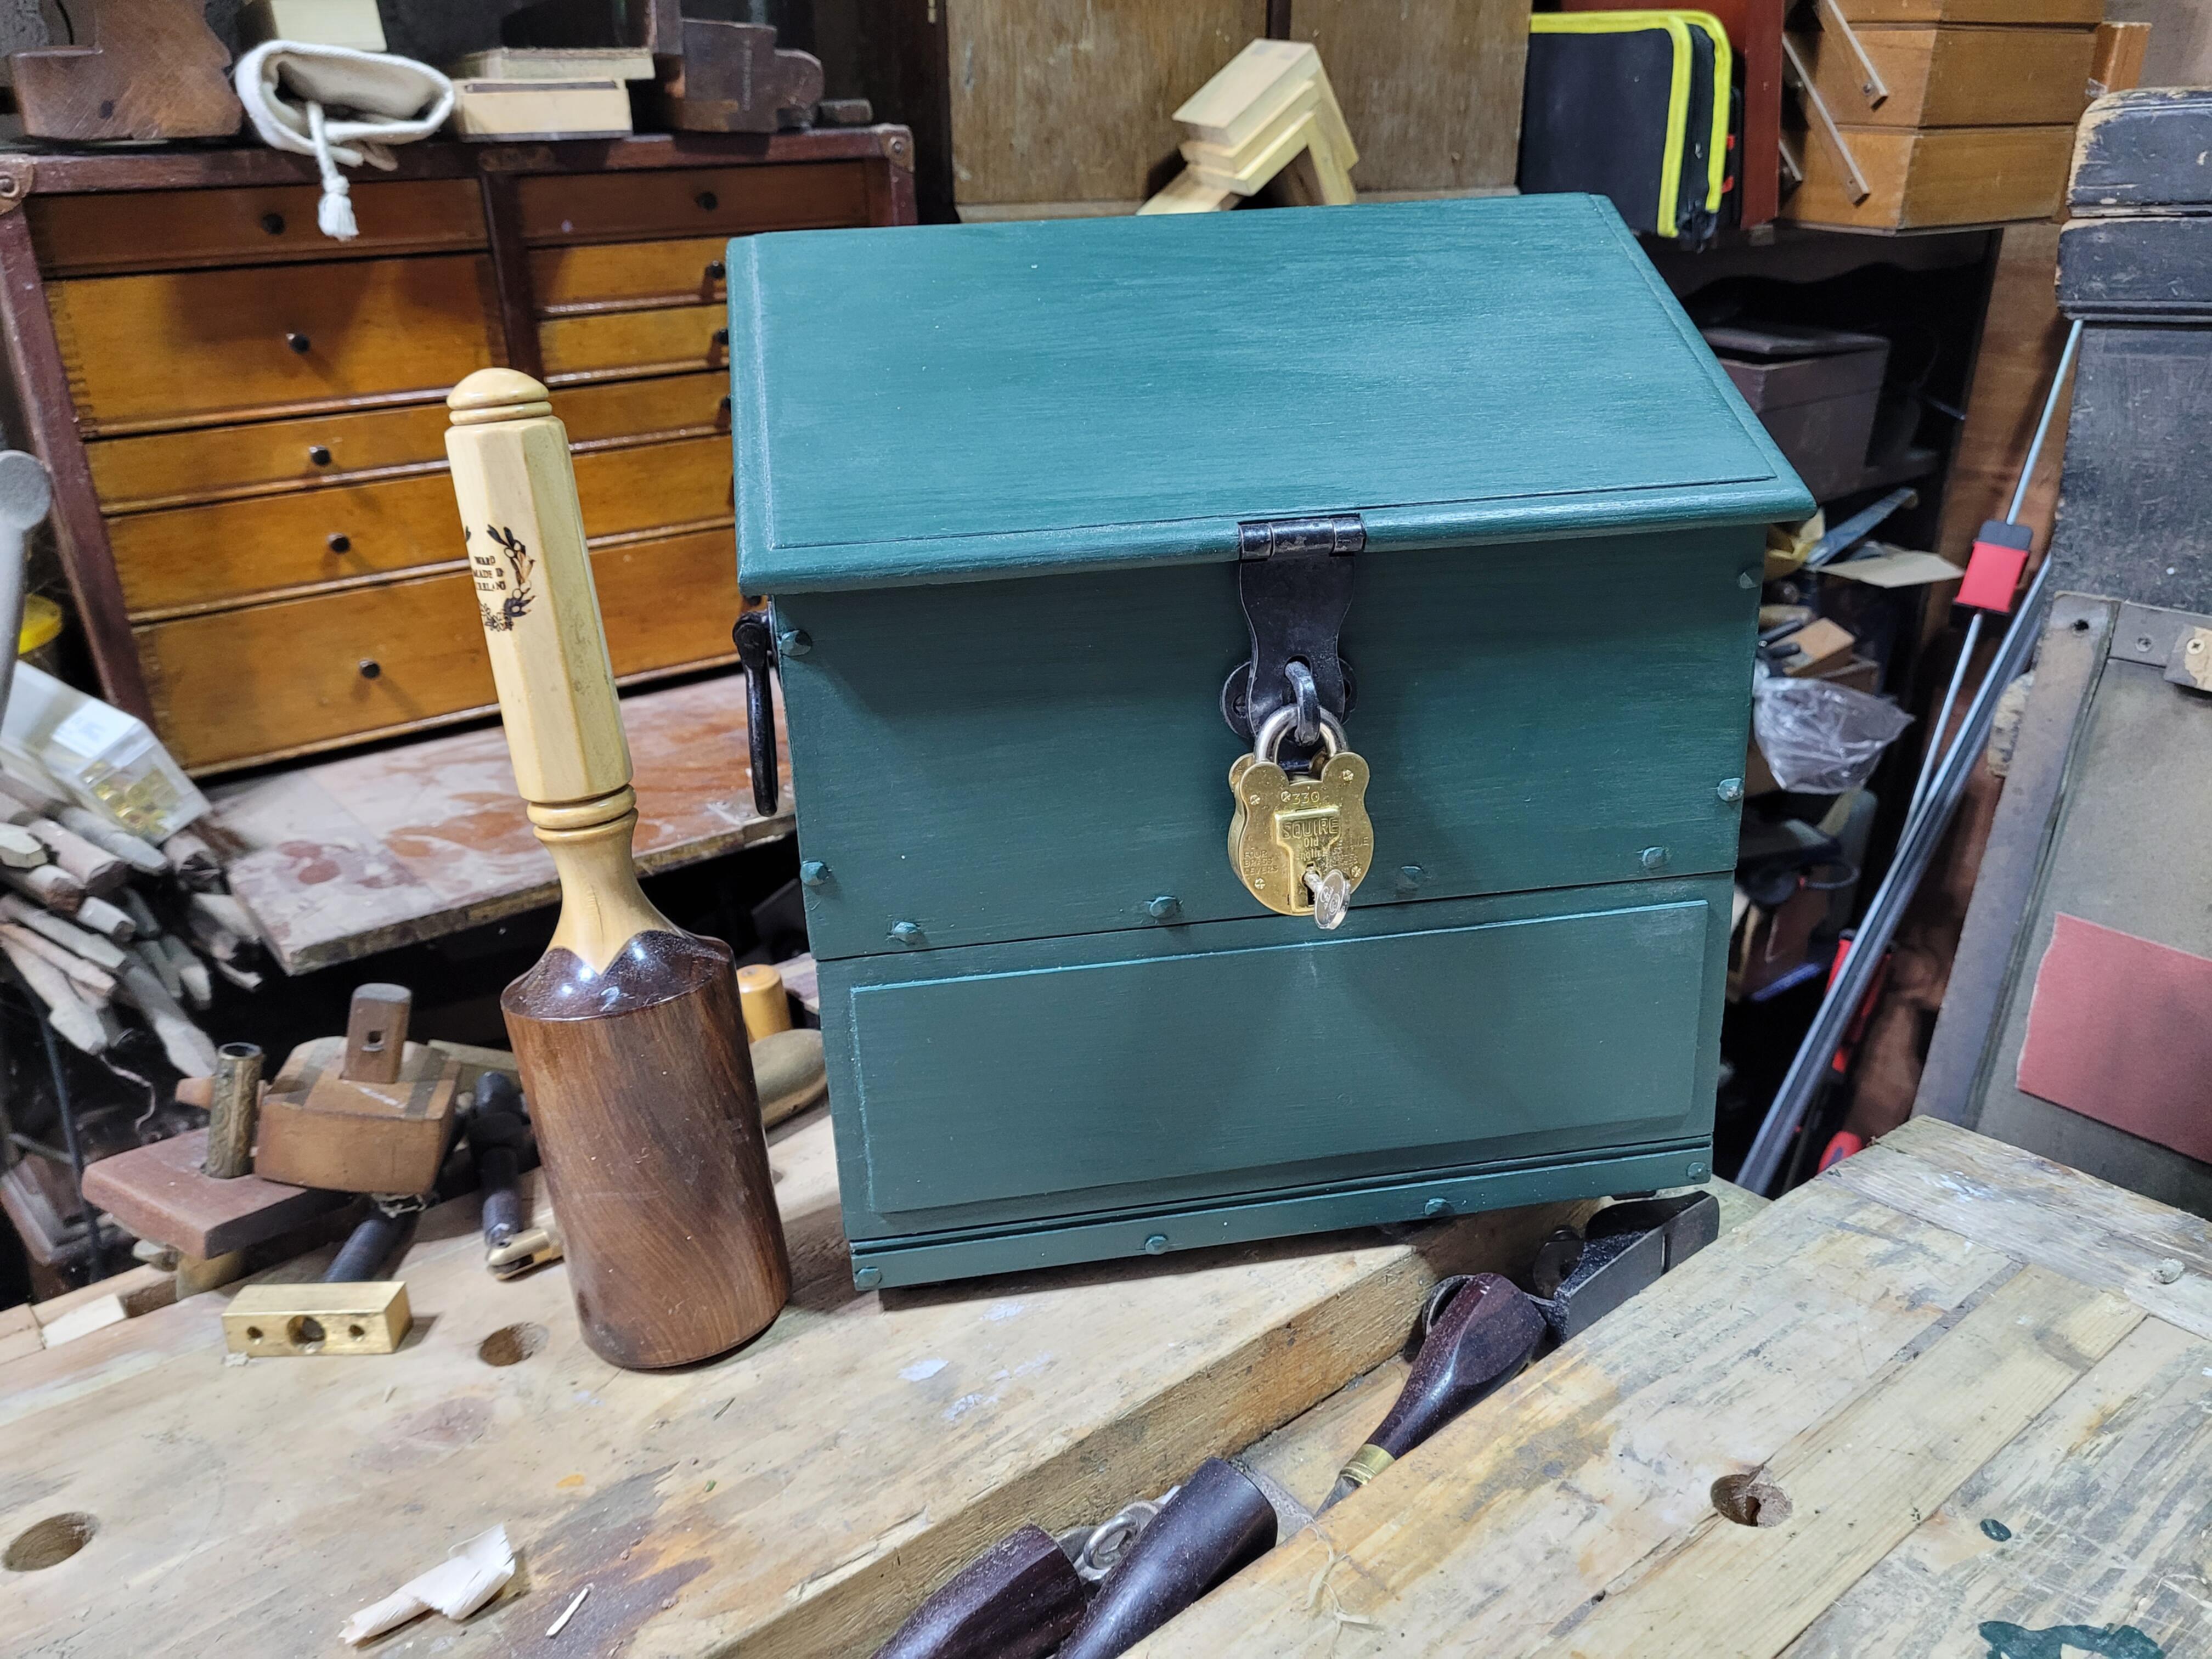
The finished chest in its usual spot. The rear right hand side of my bench. Its small enough that its easy to lift out of the way if I need the entire bench top and it does not interfere with the front half of the bench. The Squire lock on the front is a new old stock marine brass model that I think compliments the green chest nicely.
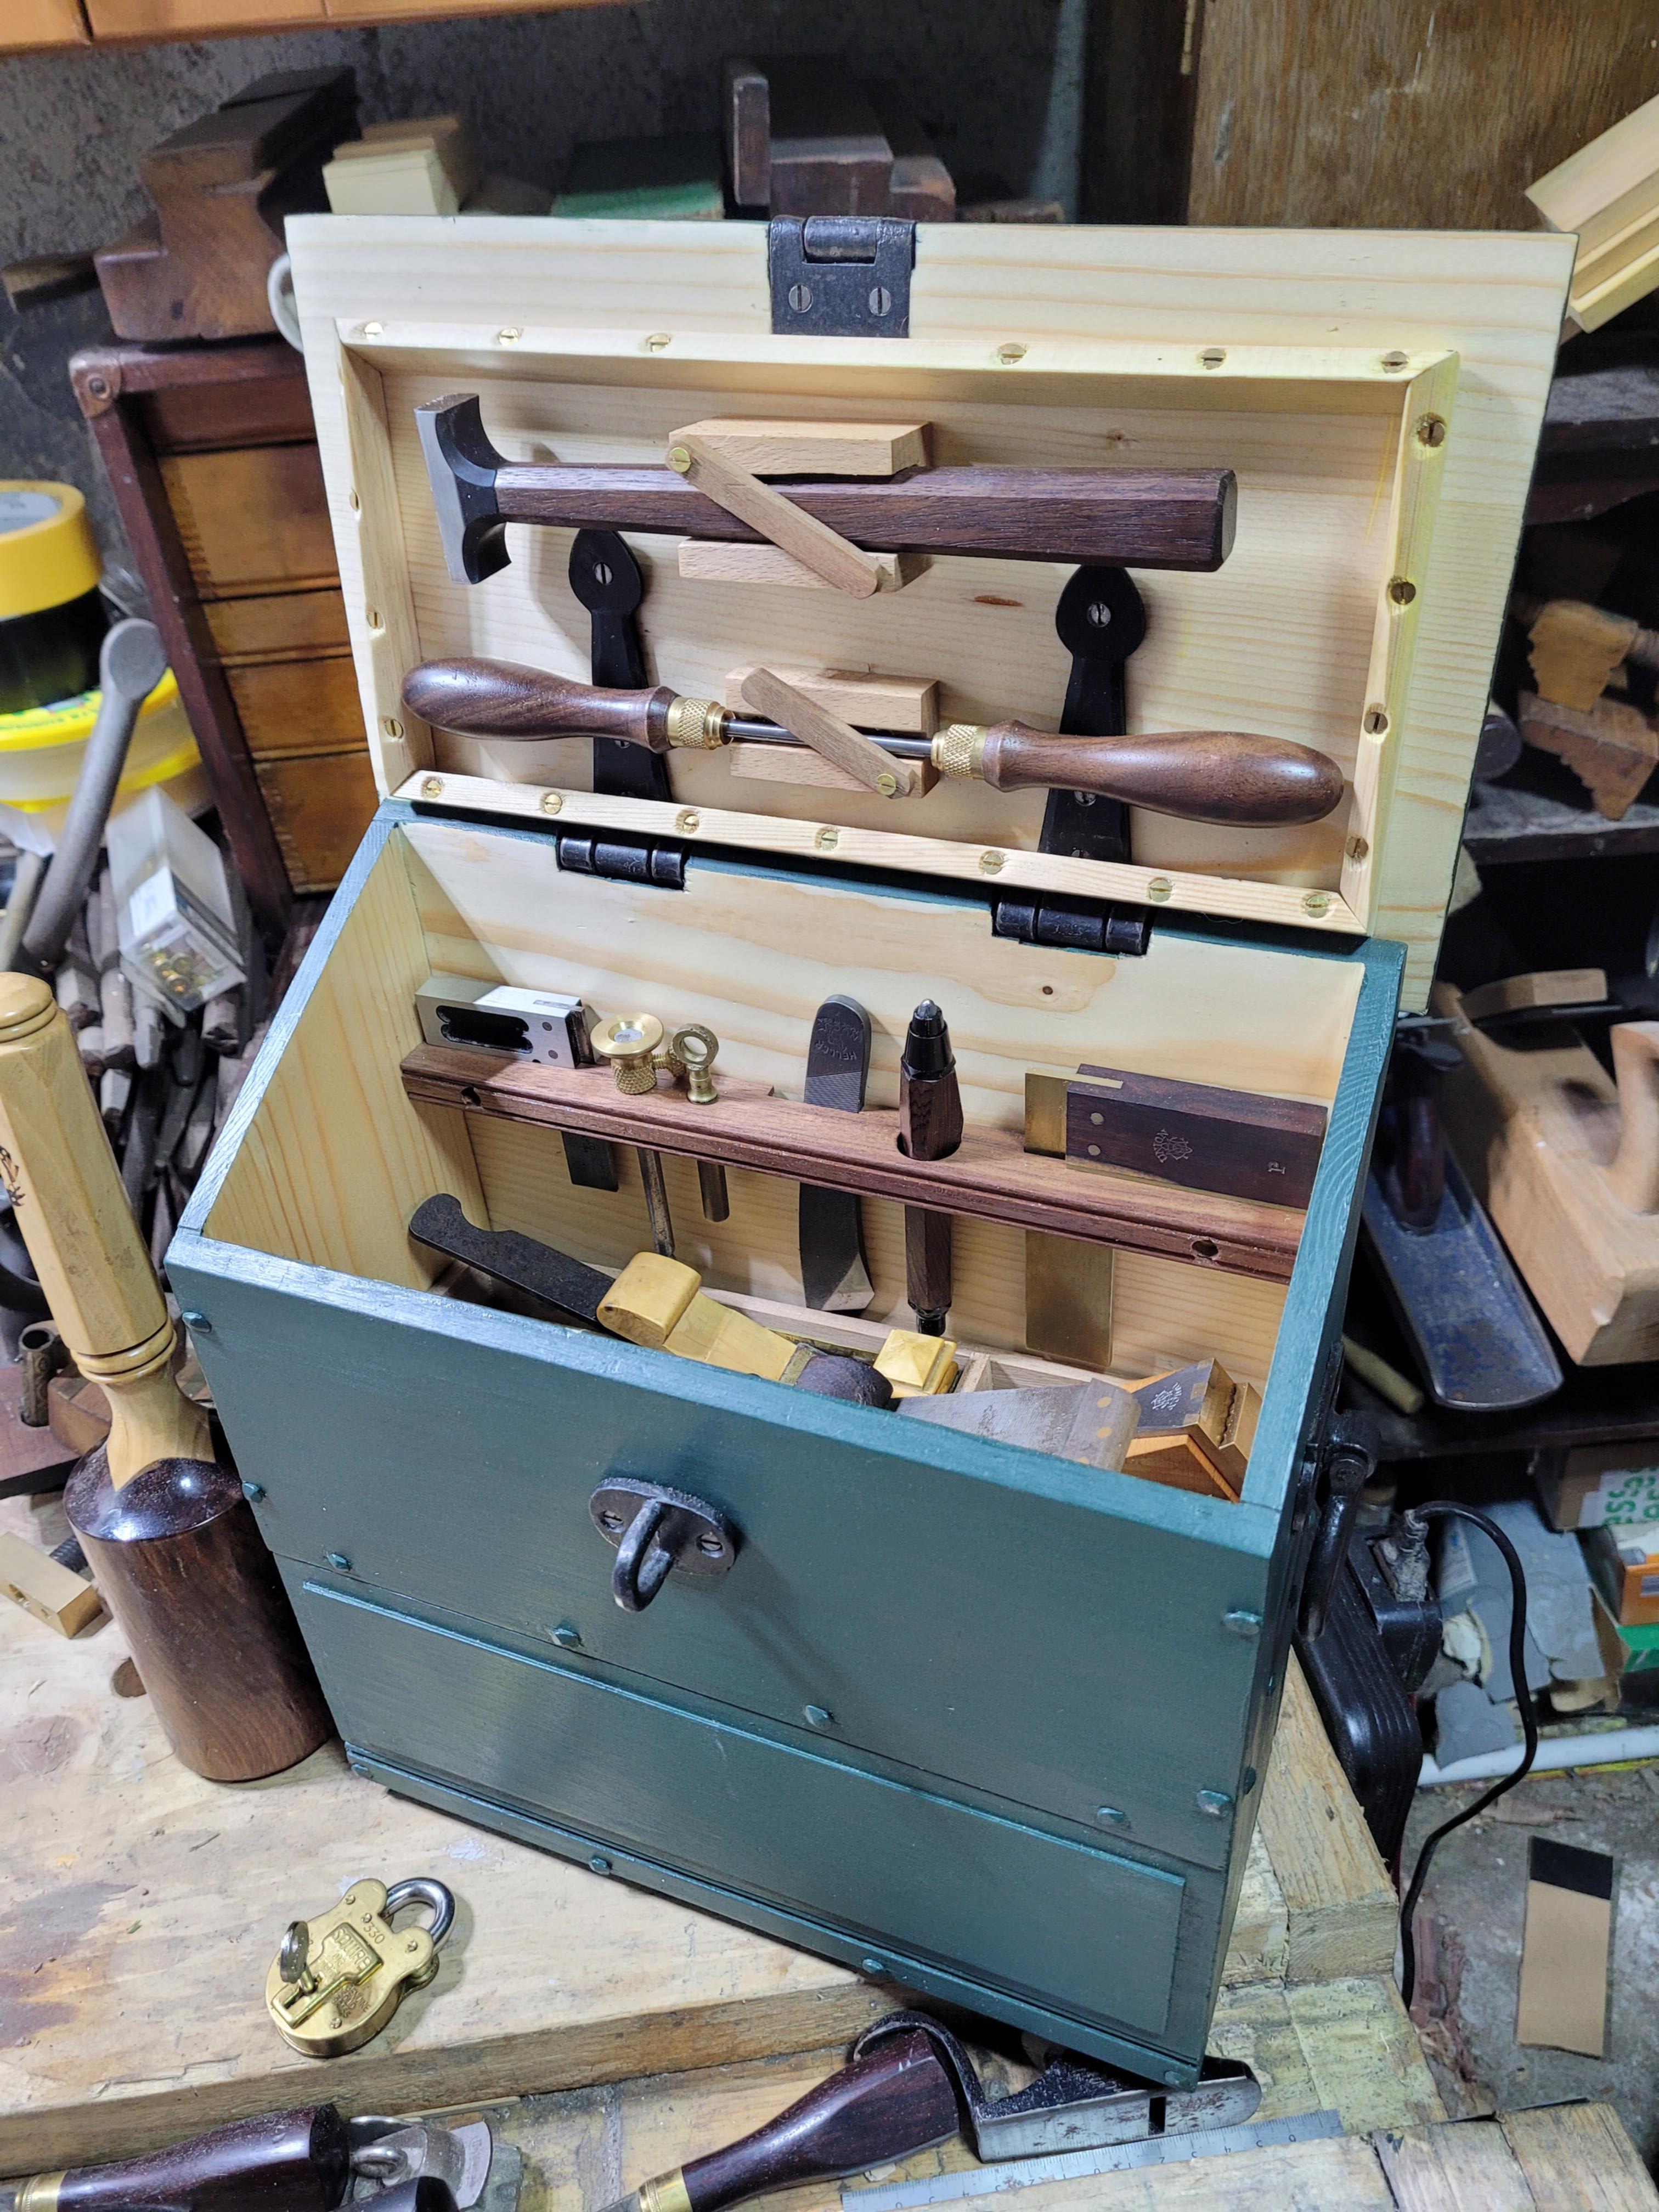
The open chest. Up on the lid you have a Union Plane adjuster mallet with a rosewood handle rather than the stock beech. The slot in the hammer holder is tapered to match the taper of the mallet handle, so it will actually friction fit into it if you put it in narrow end first, and then slide to the side to wedge it.
Below that an Accu-Burr with particularly figured walnut handles that where a very kind gift from Matthew Platt of Workshop Heaven
Both are framed quite nicely by the dust seal.
Below that you can see the tool rack. Its just a piece of walnut with a decorative bead. I had a divil of a time finding a screw that was long enough to hold it in, but short enough not to go through the 3/8th inch thick chest back. Dave O’Sioda even dropped around one night with a bag of different sized brass screws to help me try and find something that worked. I had very little space between the beads. Most screws that had the right length, had too large a head. I eventually used screws that were a little too short, and drilled a hole the heads could sink into to get them to project out the back enough.
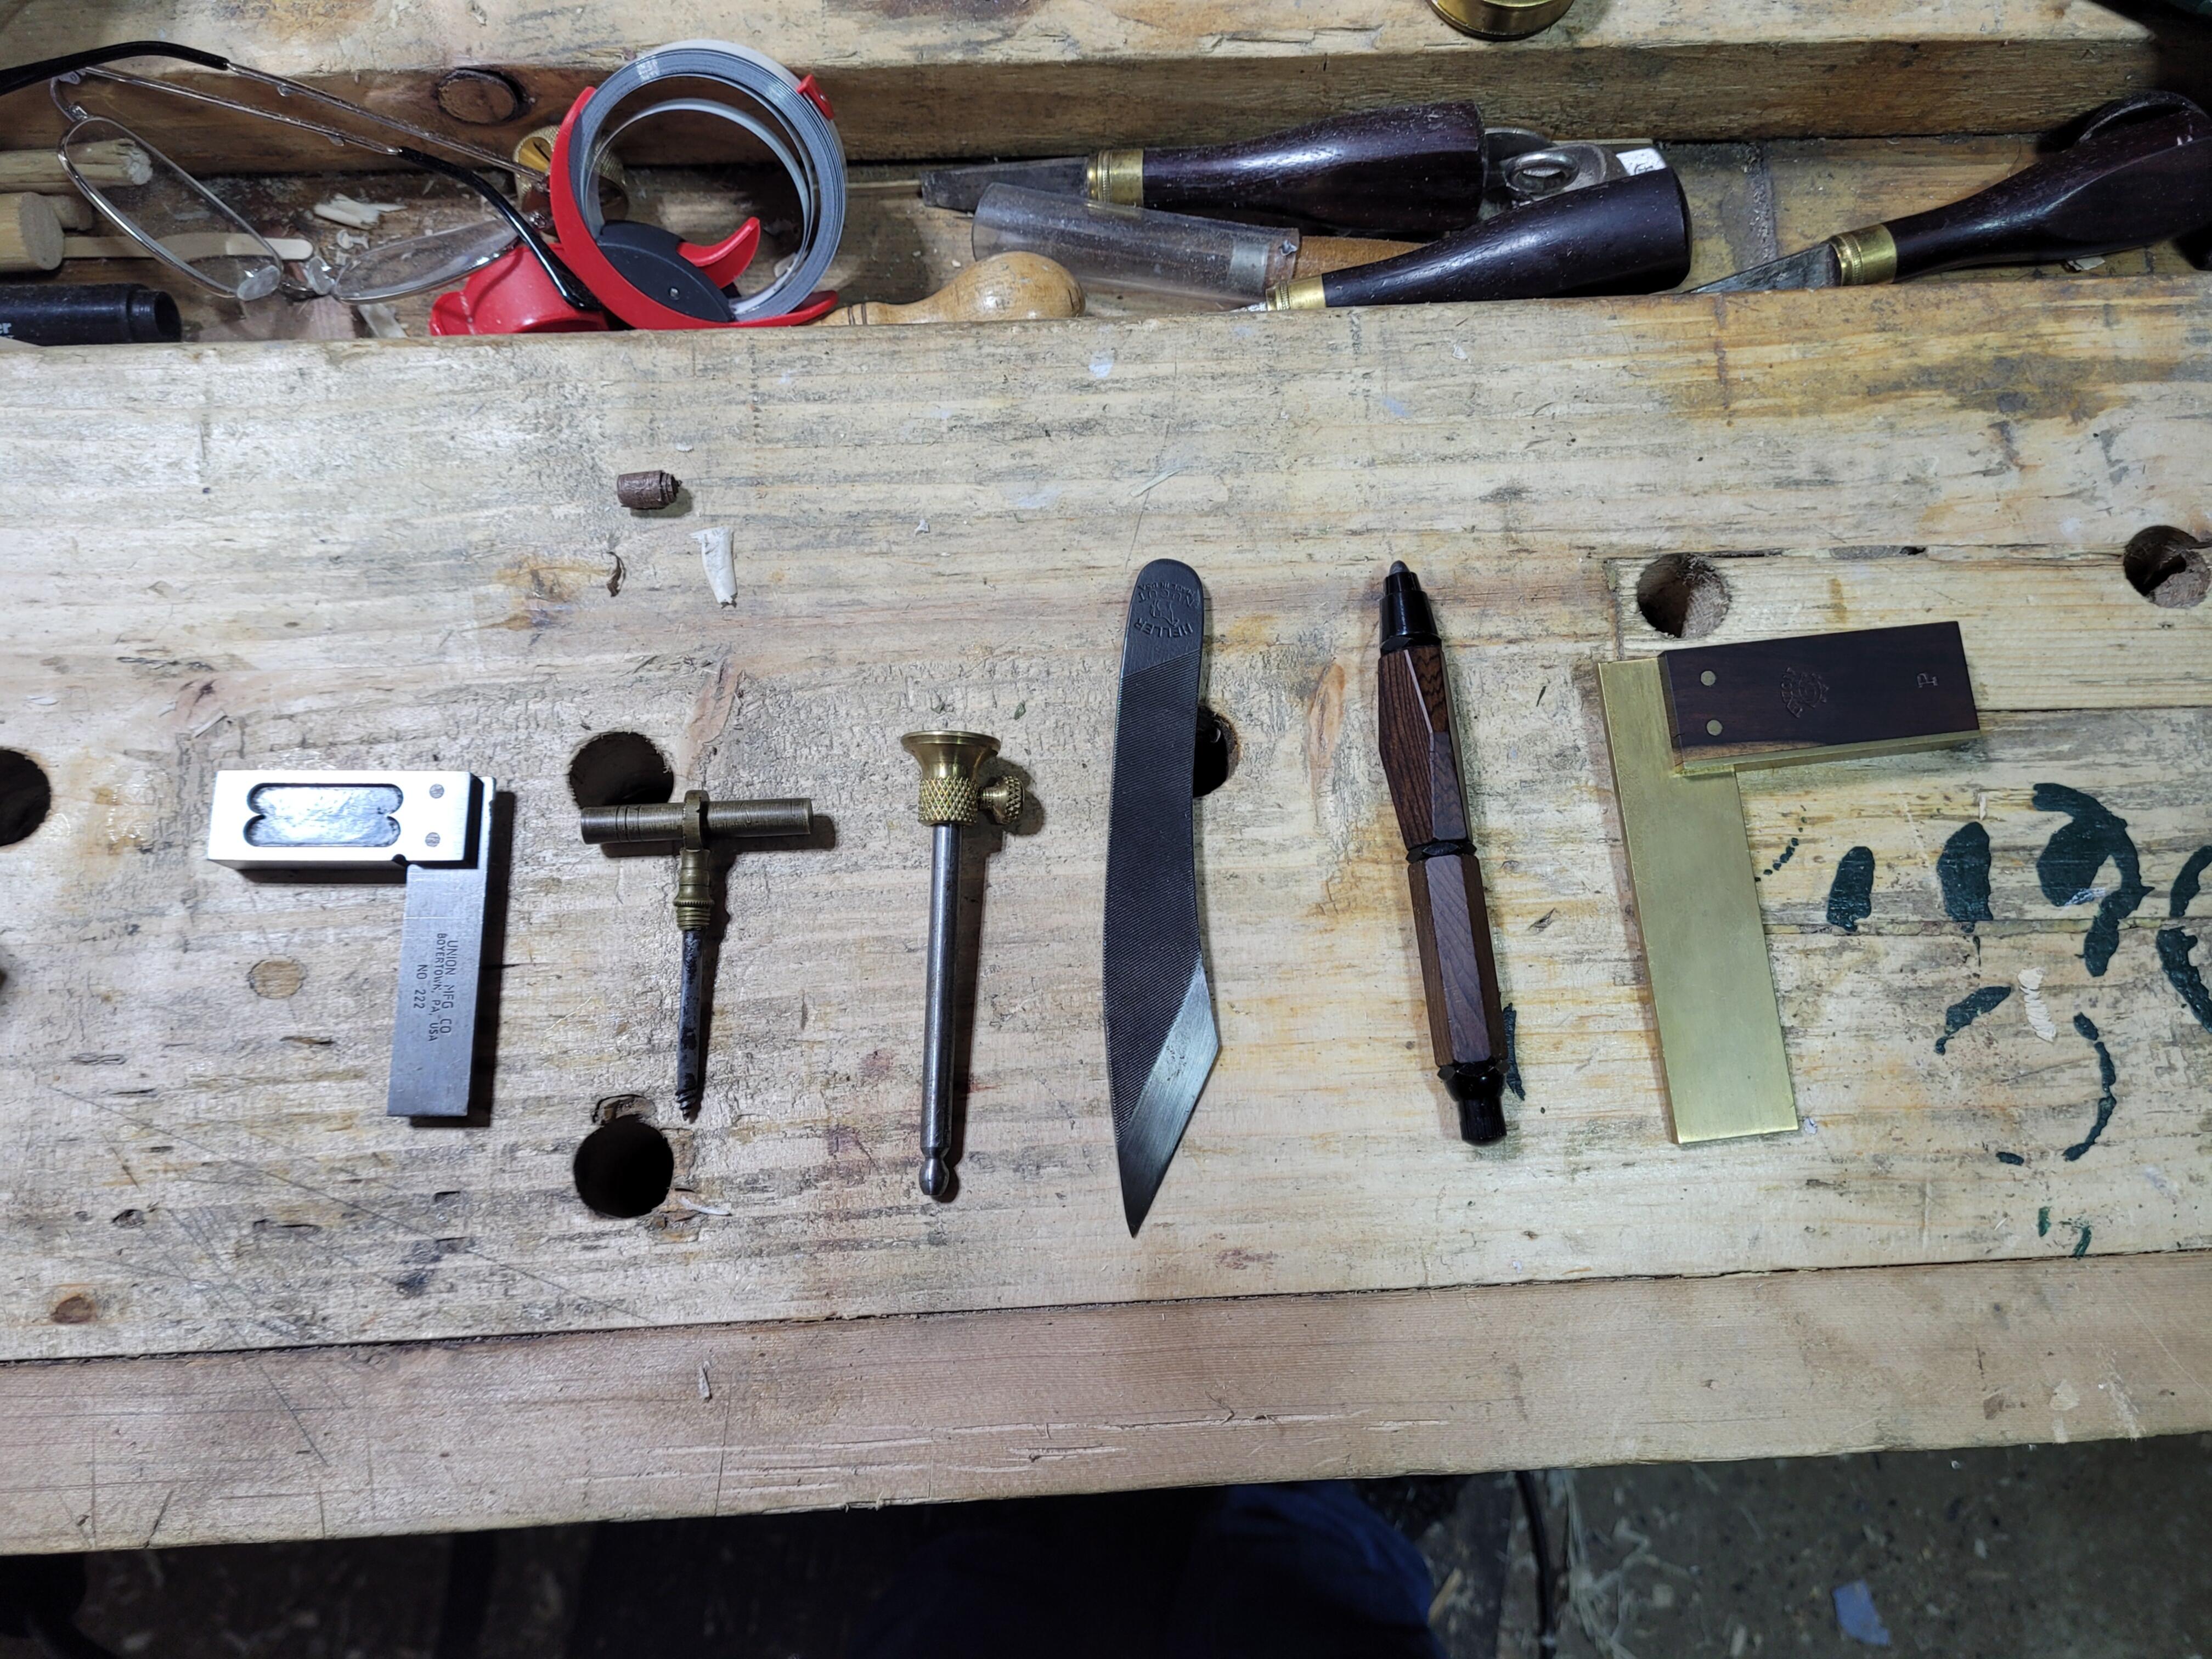
The tools that live in the tool rack. From left to right.
Union 222 Precision square. This is a one off with stainless steel rather than the usual brass pins.
Vintage Gimlet. A wonderful gift from Andy Brown. The holder is precisely made, so that when the gimlet is unscrewed it can slide into the hoop on top. It has a very subtle taper that causes it to stop in exactly the right spot to function as a T-handle.
Mini marking gauge by Tom Dickey.
Kiridashi Knife by Gordon McCall. Made from an old file.
Ric Archibald “unturned pencil”.
Union 254 Try Square Prototype with an Ironwood stock. Yet to be produced and sold.

Now a look into the upper till.The corrals are just friction fit for now. I want to live with the layout for a little bit before I make it permanent. When I do I’ll use some headless brads to put them together.
The till tools. From back to front.
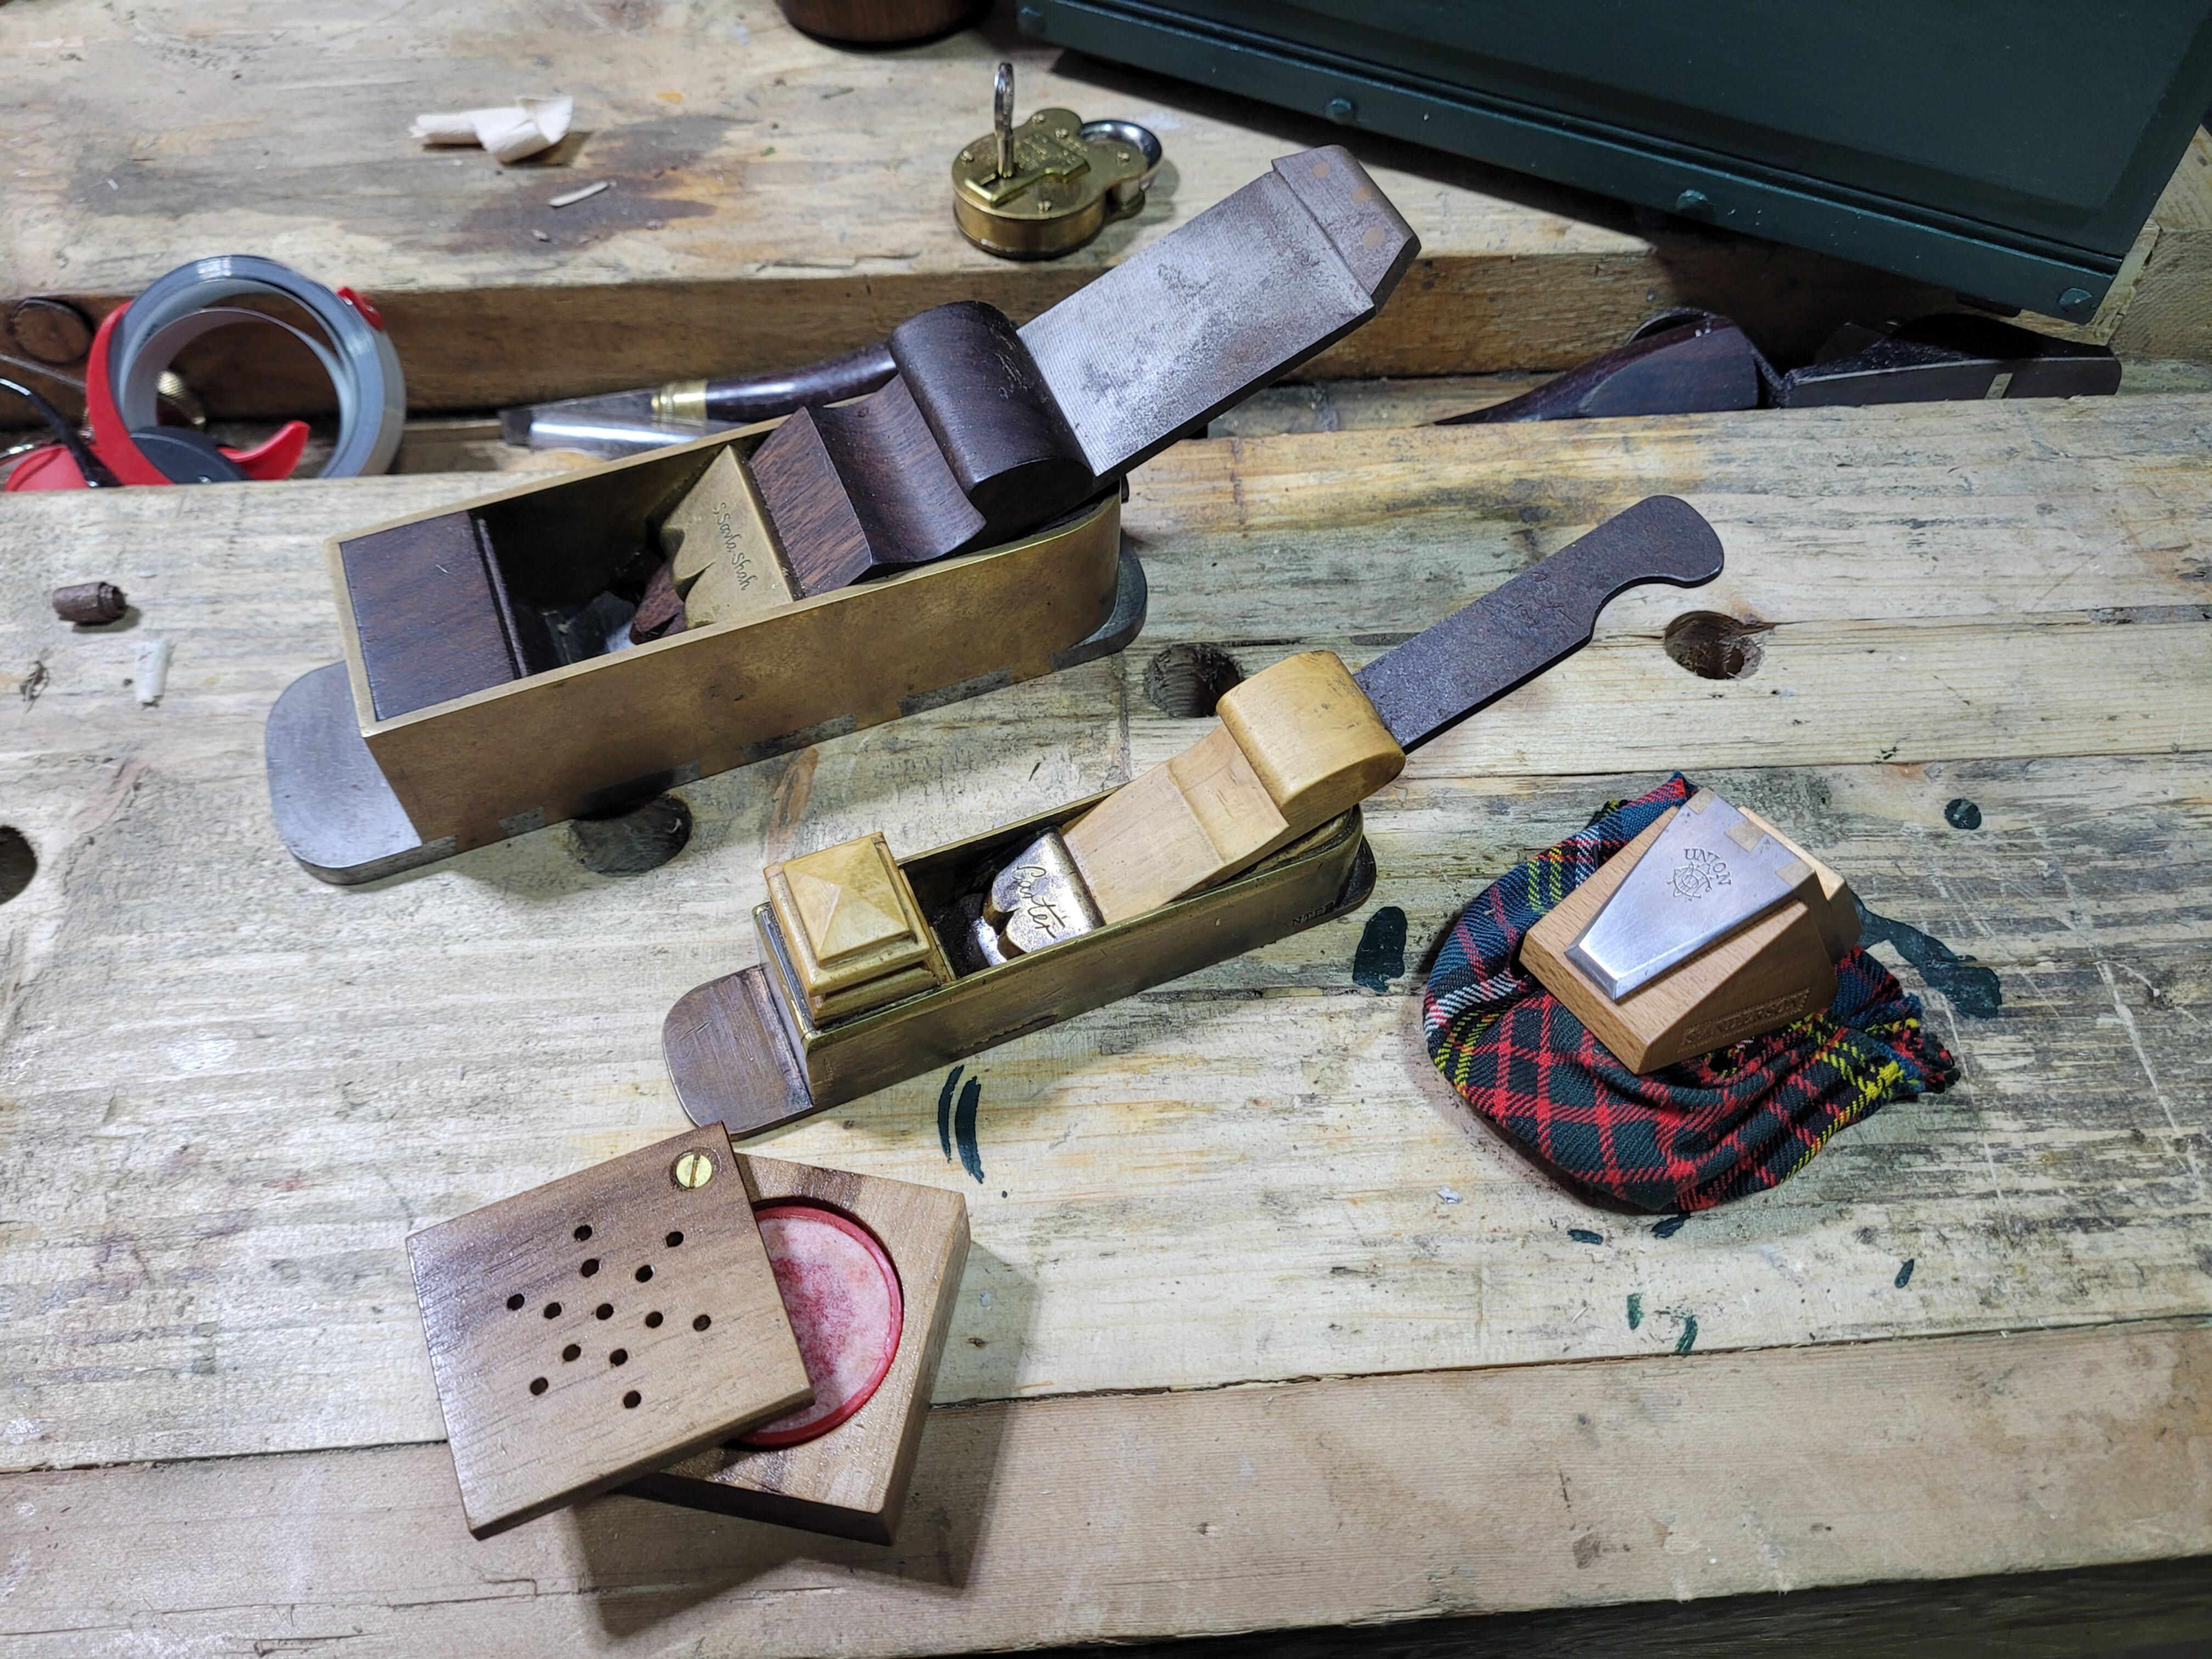
Shrenik Savla-Shah mitre plane. An absolute work of art. If this plane cant plane it without tear out. Nothing will. This is the plane the entire chest was built to hold.
Bill Carter small mitre plane. I sometimes take this out not to use it, but just to admire the boxwood front bun. A work of art. The sides are made from a vintage Skelton saw back (not Shane Skelton there was a vintage Skelton).
Front right - Scott Anderson dovetail marker. Scott made this for me out of a piece of Union plane iron dovetailed into a brass top. It has its own magnificent wooden holder with a tartan bag to keep it cosy. Its a hand filed piece of art. You can see some more photos here
Front left. I like using VCI pots to keep the rust at bay. But a little plastic tub would look too ugly in this chest. So I made this little holder to keep it hidden.
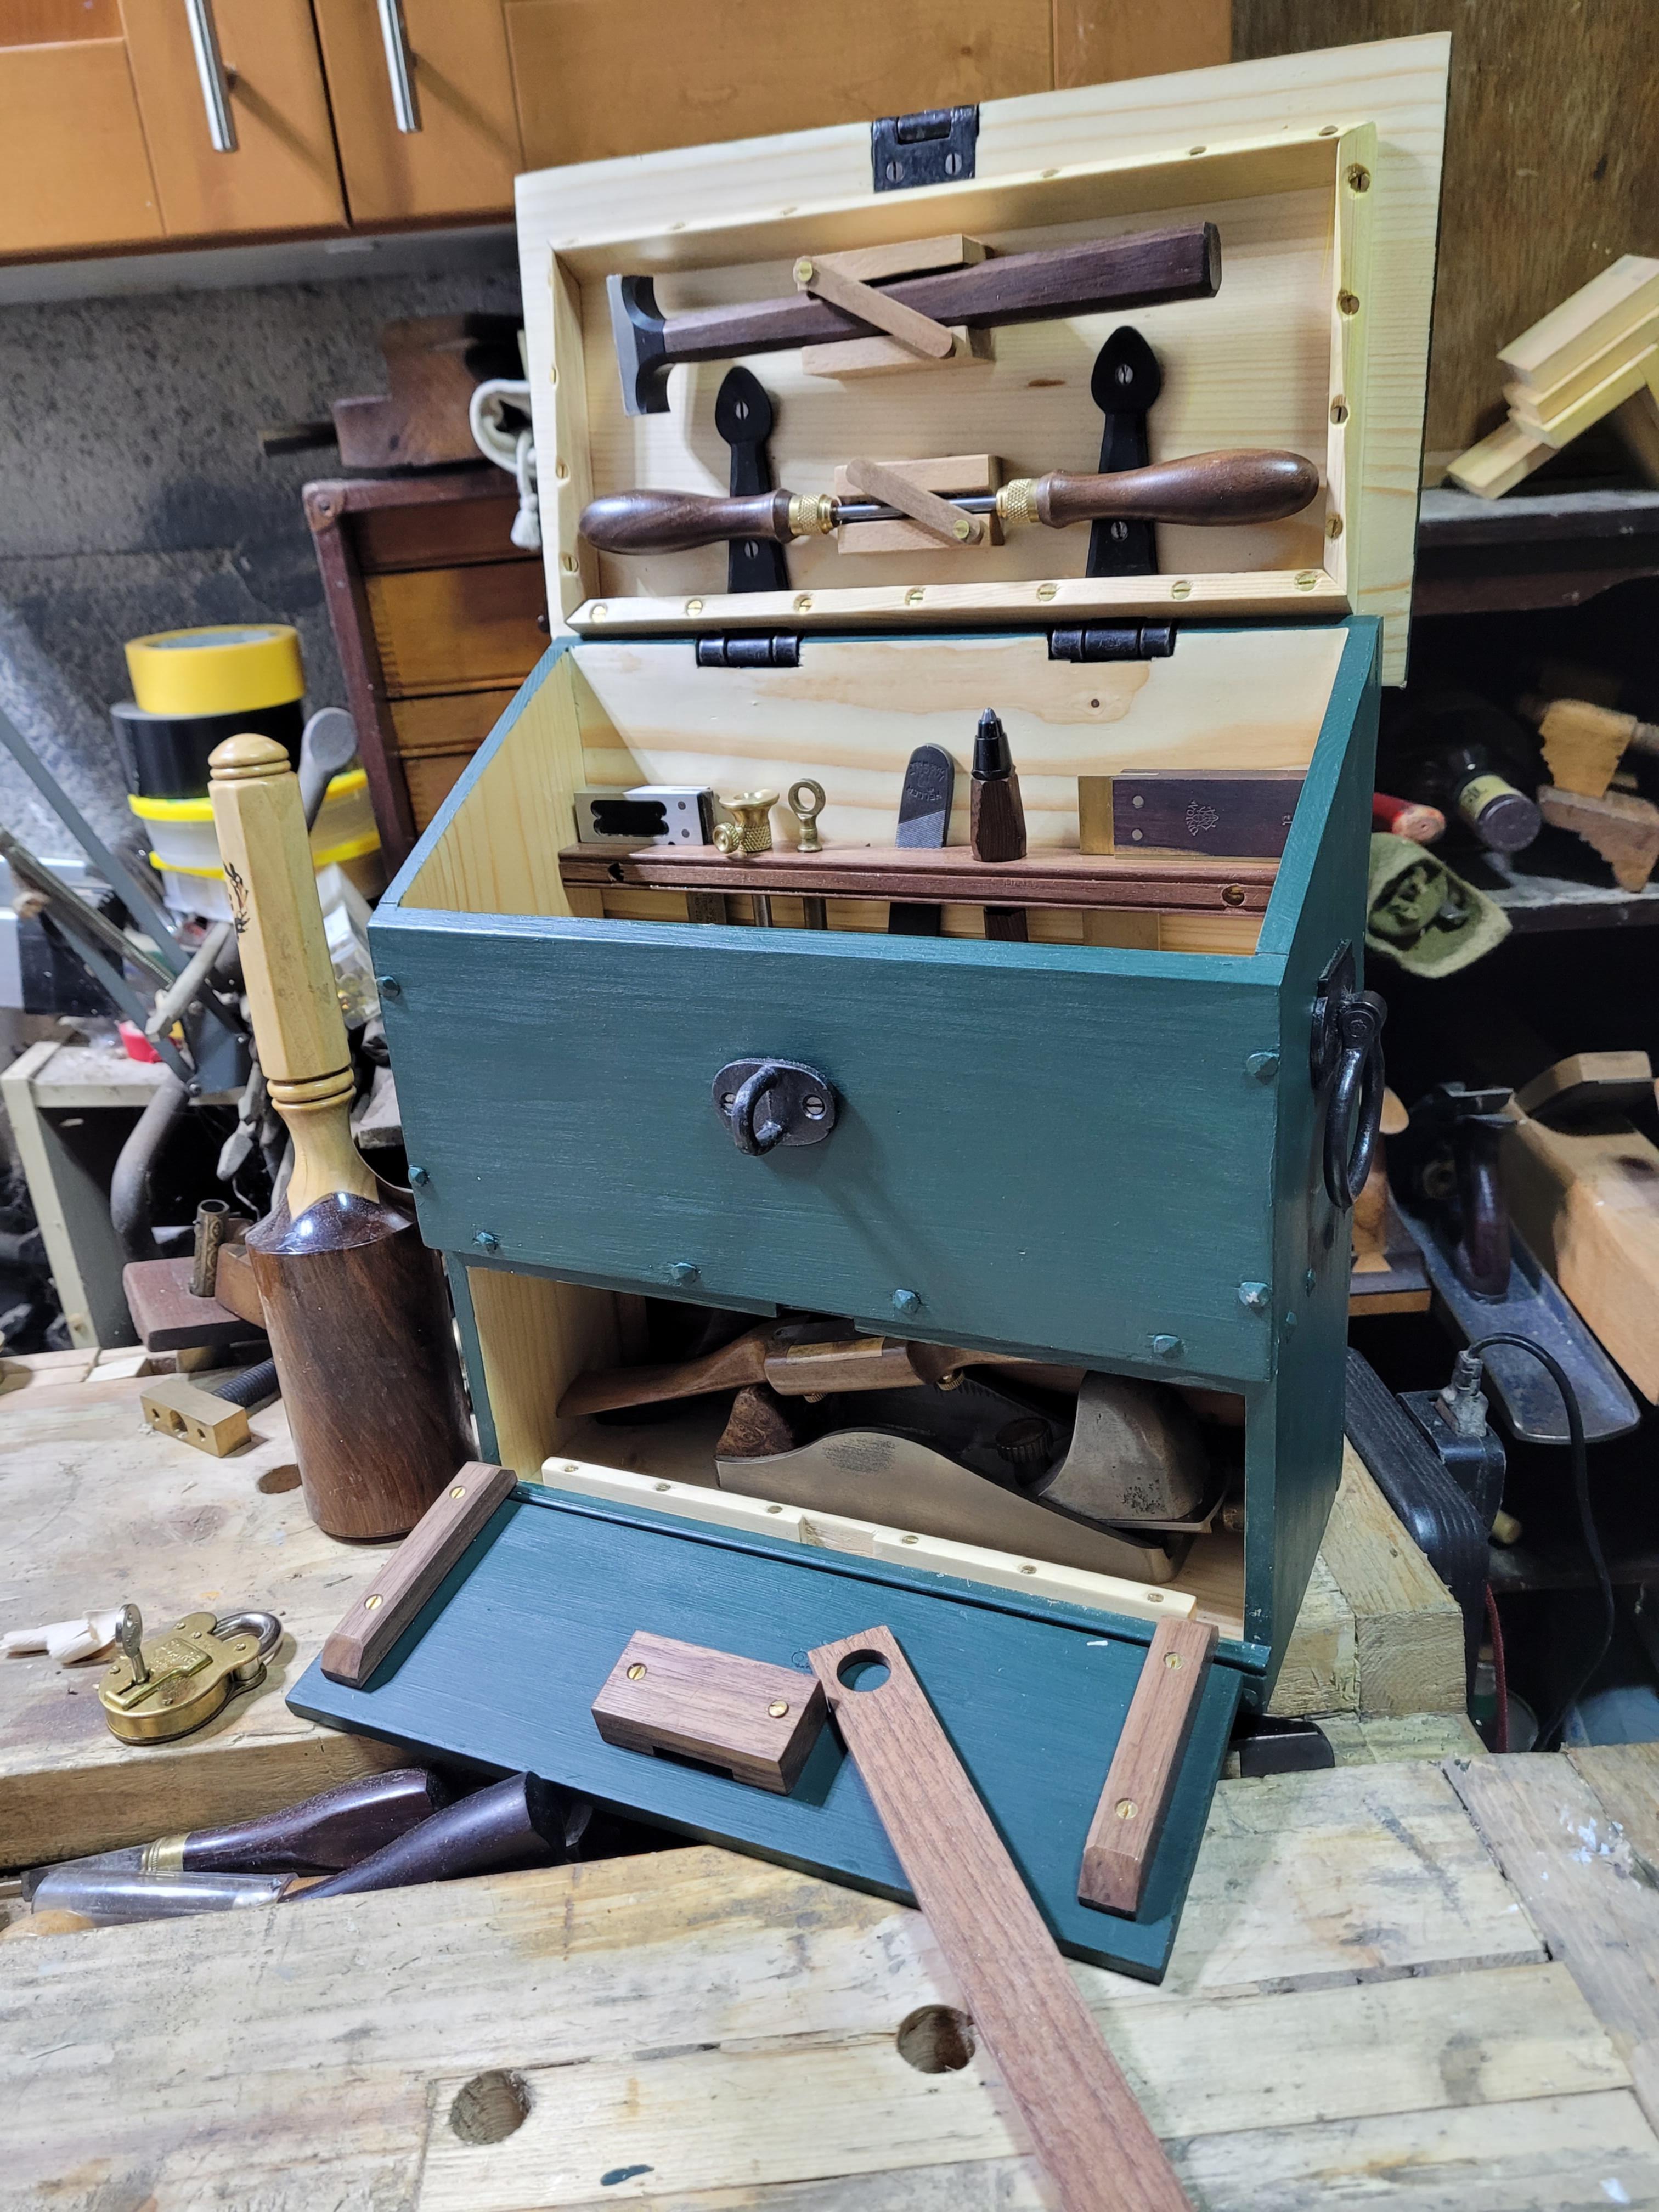
Now we get to the bottom till. If you are unfamiliar with Dutch tool chests. When closed the stick passes through the floor of the upper till, and down through a holder in the bottom till door and into a notch in the floor. If its the right length, you cannot open the bottom till, without first unlocking and opening the top to withdraw that stick. The hole in one end is just to make it easy to grab and pull on.
You can see the extra dust seals here on the bottom and top The top one has been painted green, which makes it a little harder to spot. You can also see that a lot of the tools down here only just fit. I originally through I was going to have to find a way to immobilise some of these tools. In practice, its so snug getting them in and out can be work.
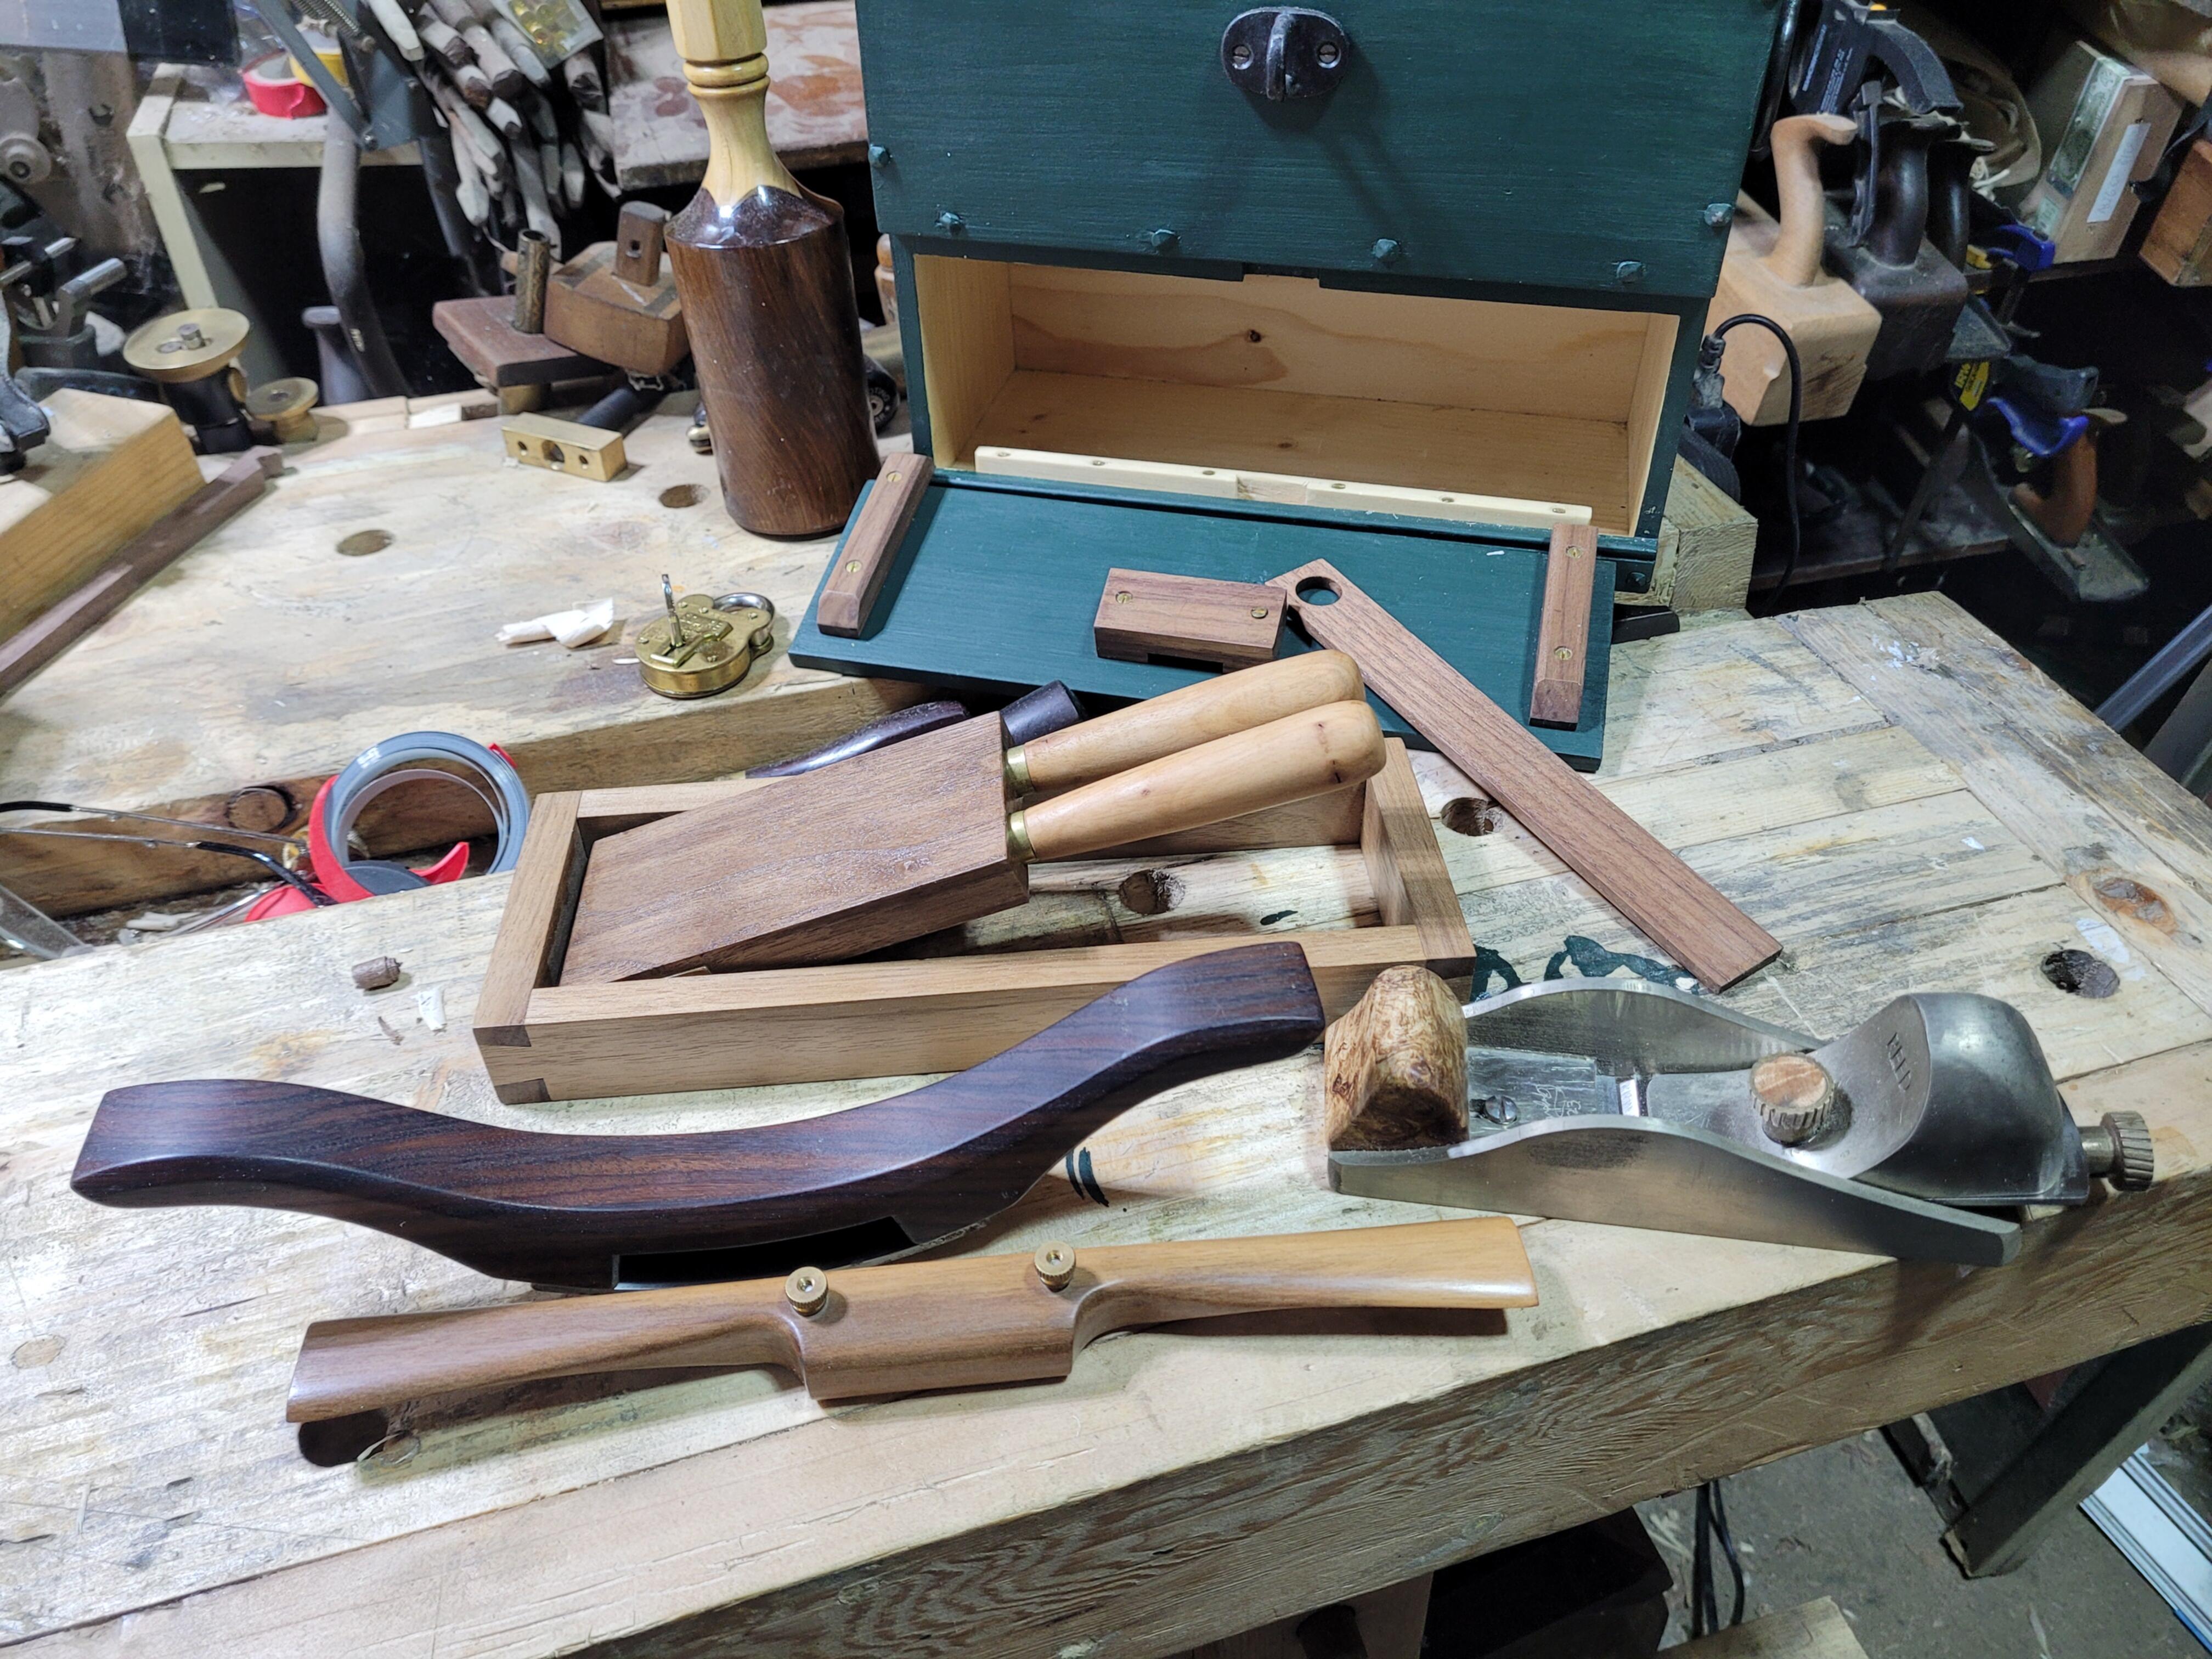
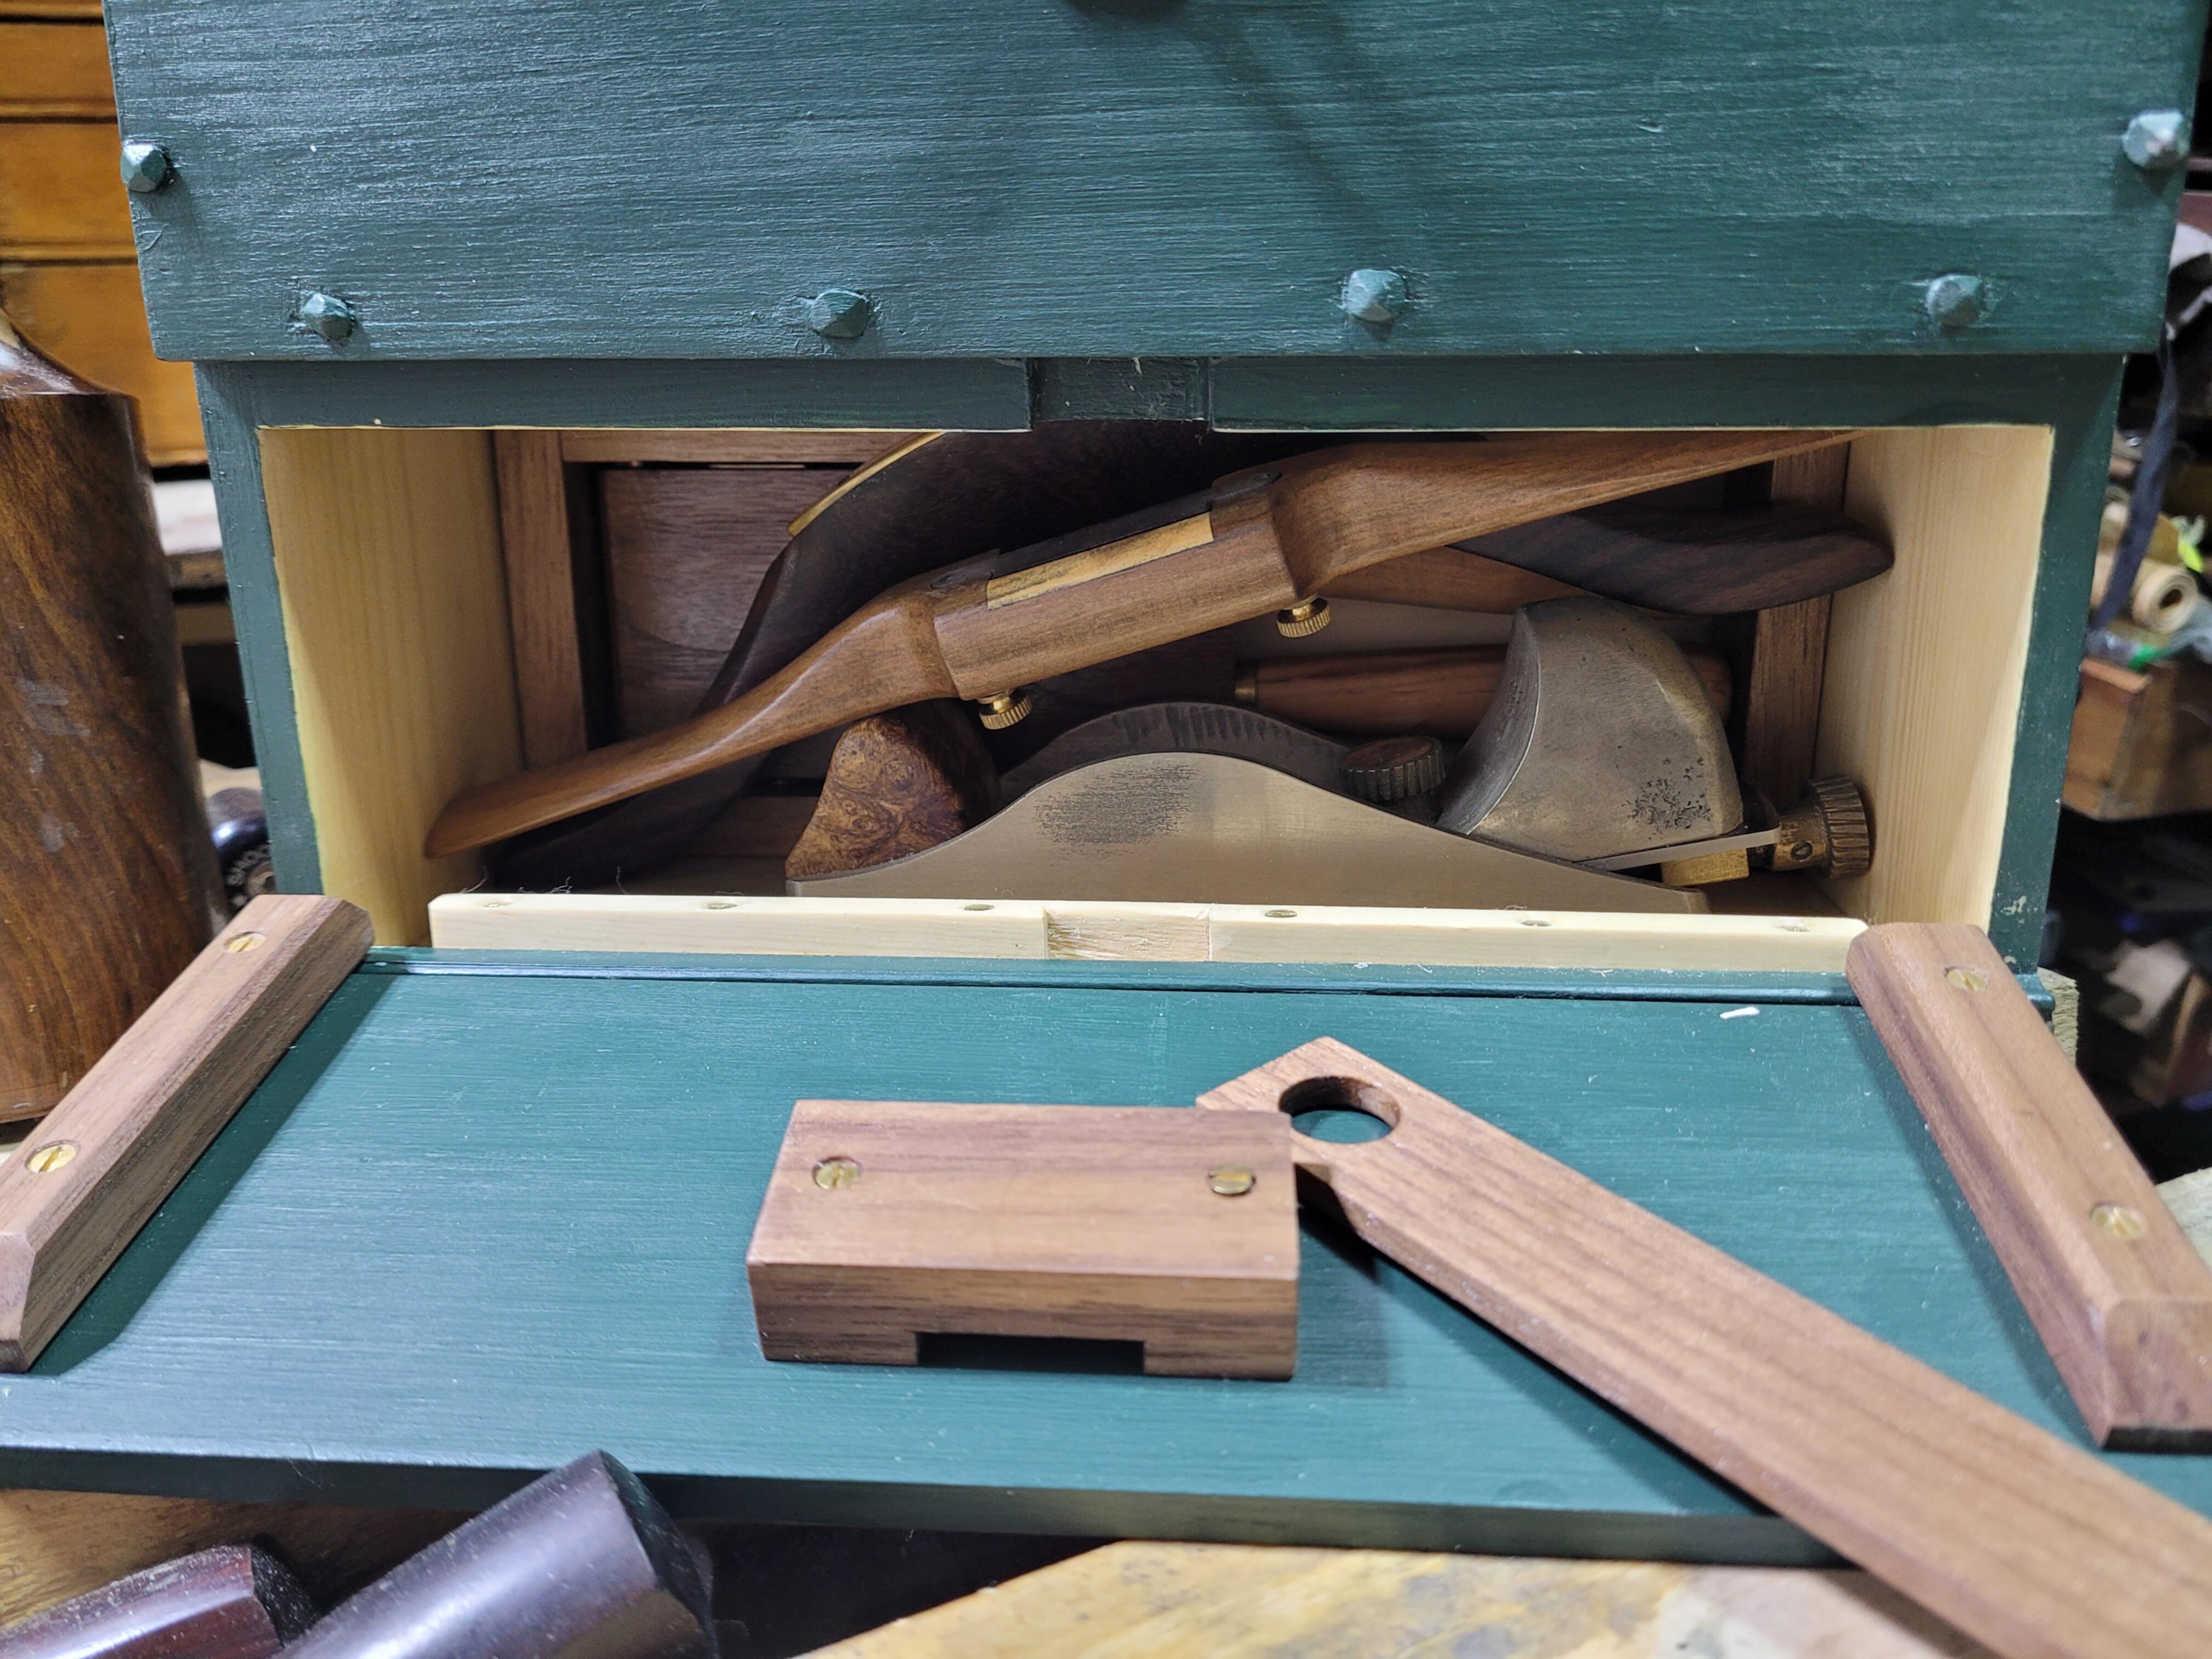
The bottom till tools.
Back - Gordon McCall chisels in their holder. One of the two Gordon made for me from an off-cut of Union Plane iron stock.
Middle left - Alan Williams rosewood travisher. This was the first tool I ever had made for me. If you are considering saving up your pennies for a hand made tool, I recommend it. I have never regretted it.
Middle Right - Reed Planes prototype block plane. This is fast becoming my favourite plane for small parts work. The mouth is almost half way down the body, giving you a lot of sole to pin down small/flexible parts before the blade hits them. Given how well this prototype works, I cant wait to see the production planes.
Front - Rusty Tchernis spokeshave. Rusty made this for me out of ebony sapwood. Its my “smoothing spokeshave”. The ultra fine mouth allows it to get a wonderful finish on almost anything.
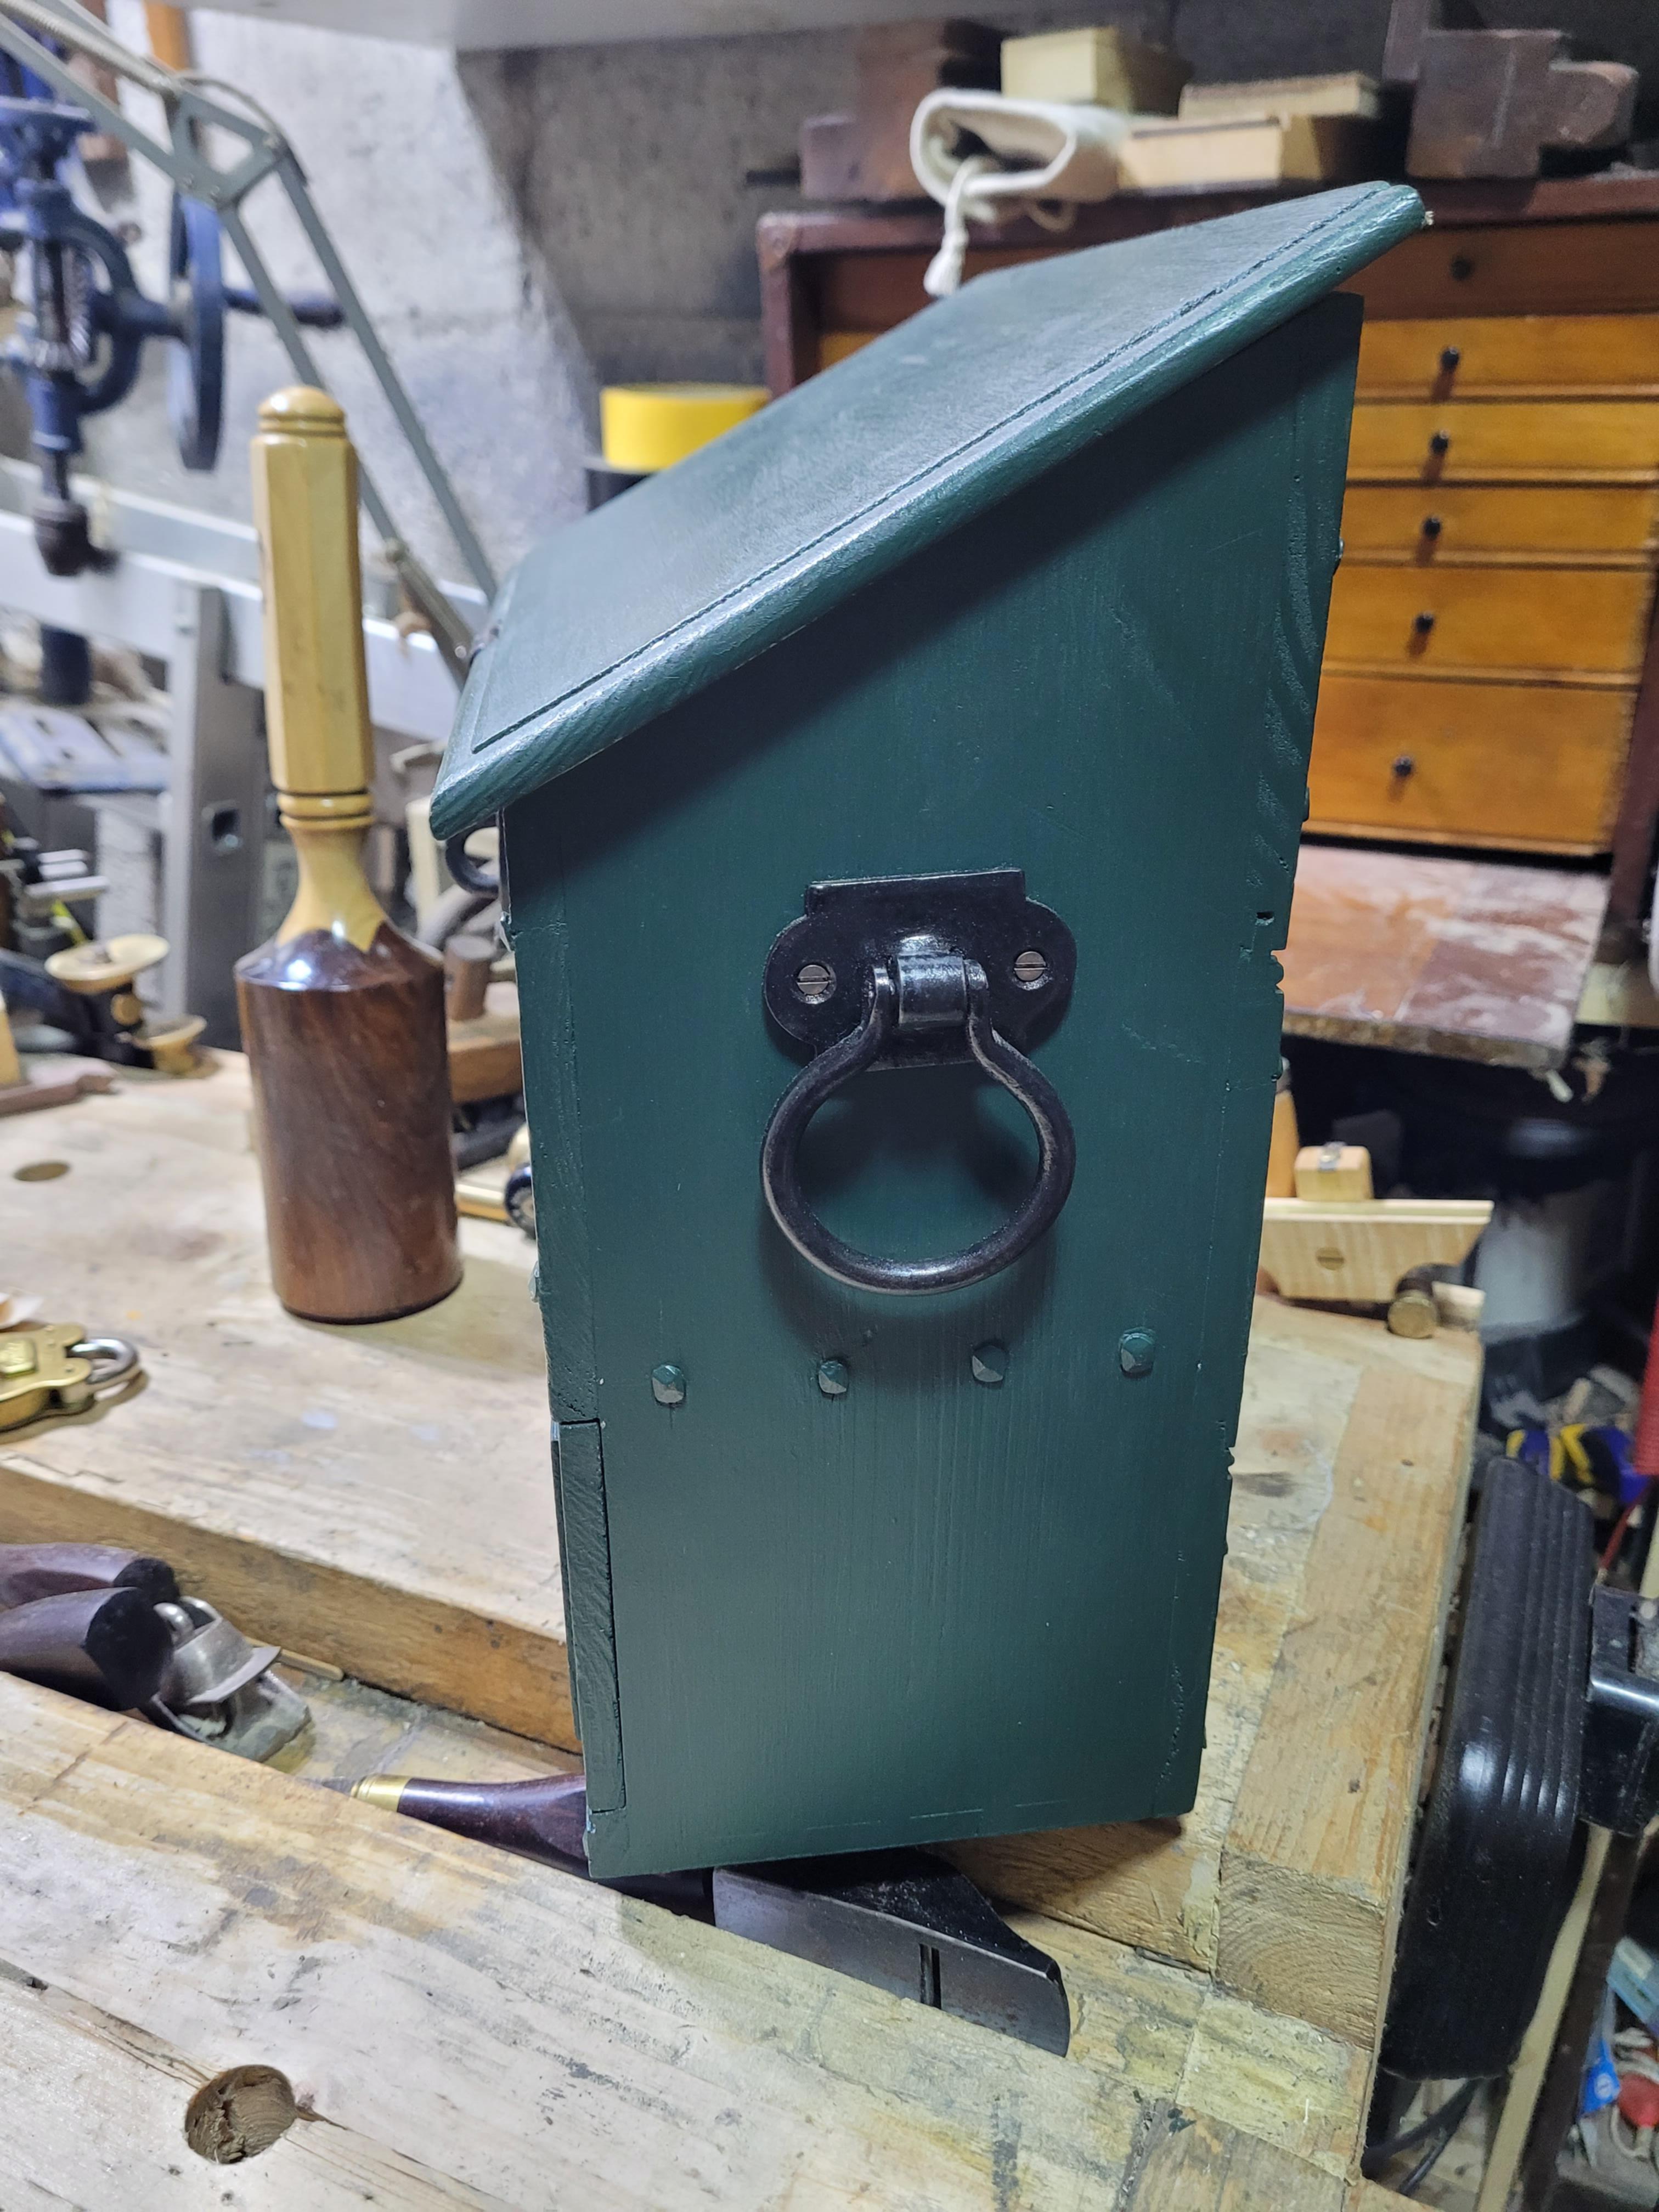
The vintage drop handles
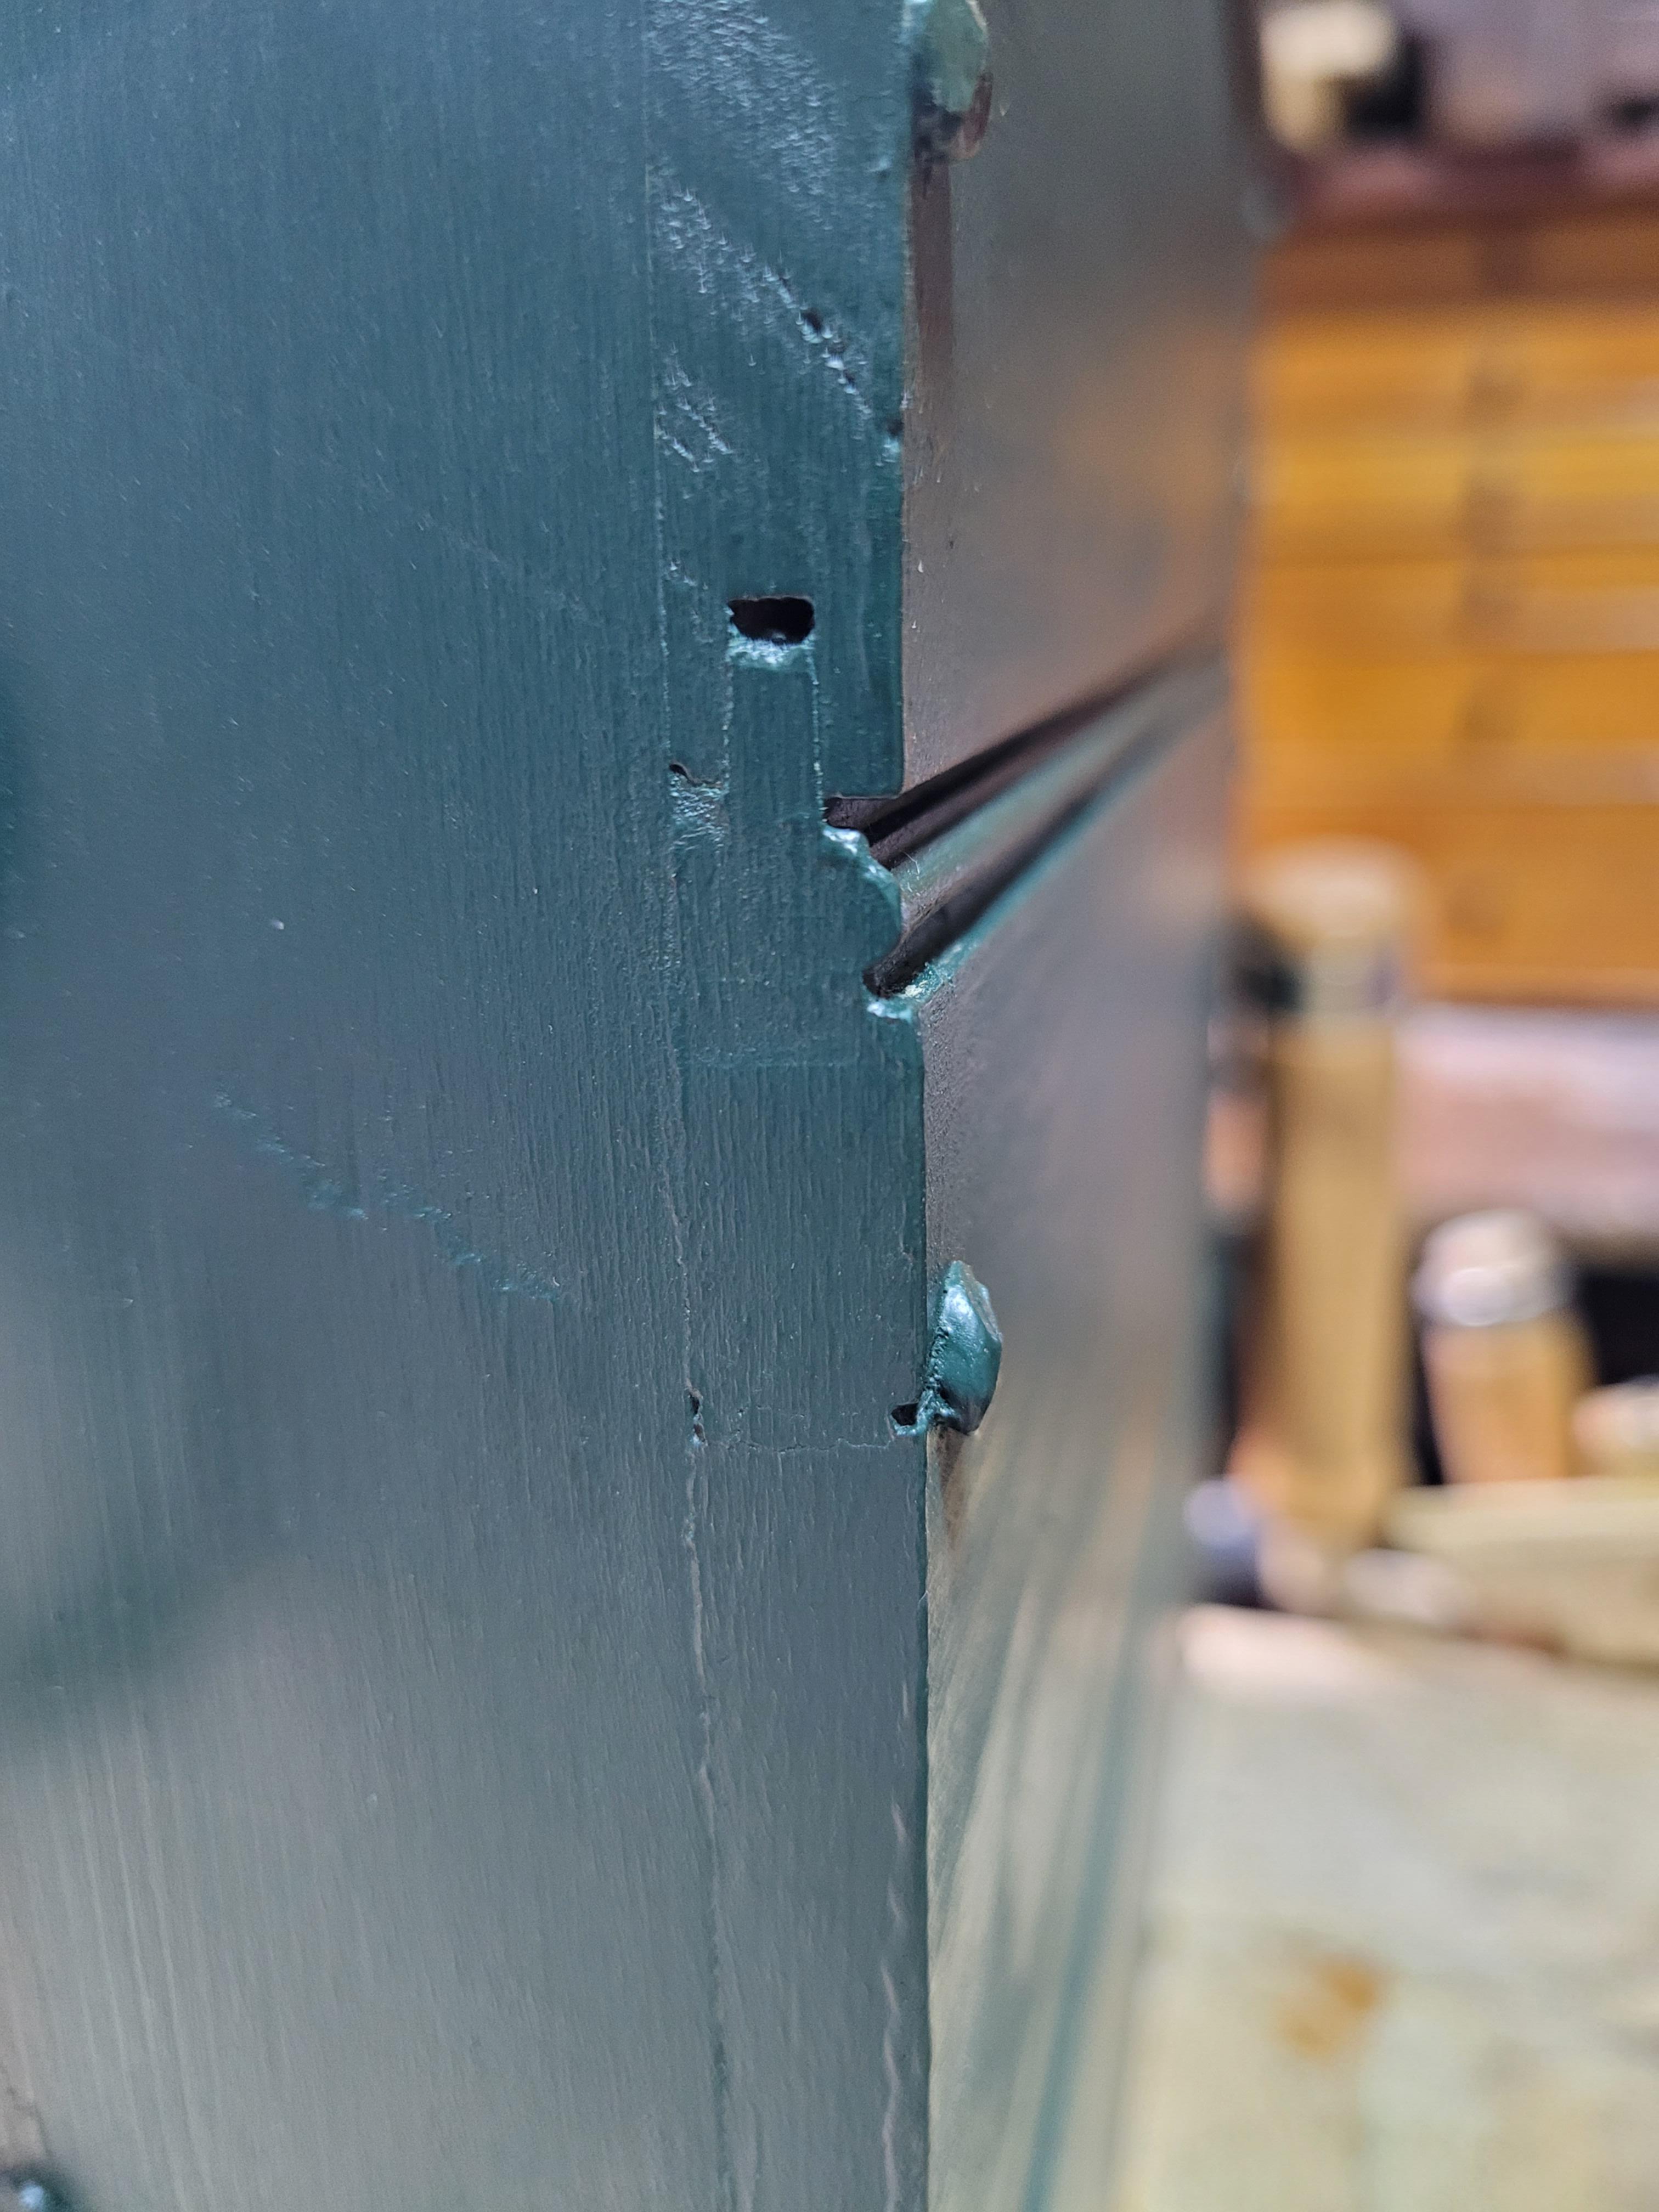
The beaded tongue and groove at the back. Something I did not think of until I was painting these, is that the tongue and groove boards require a small gap leading into the chest at the sides. As the tongue is not supposed to be all the way in, you have a little gap between the two boards. I plugged it with wood filler before painting. Time will tell if that holds/lasts.
I do like how a little bead makes the back so much nicer to look at (not that I spend much time looking at the back).
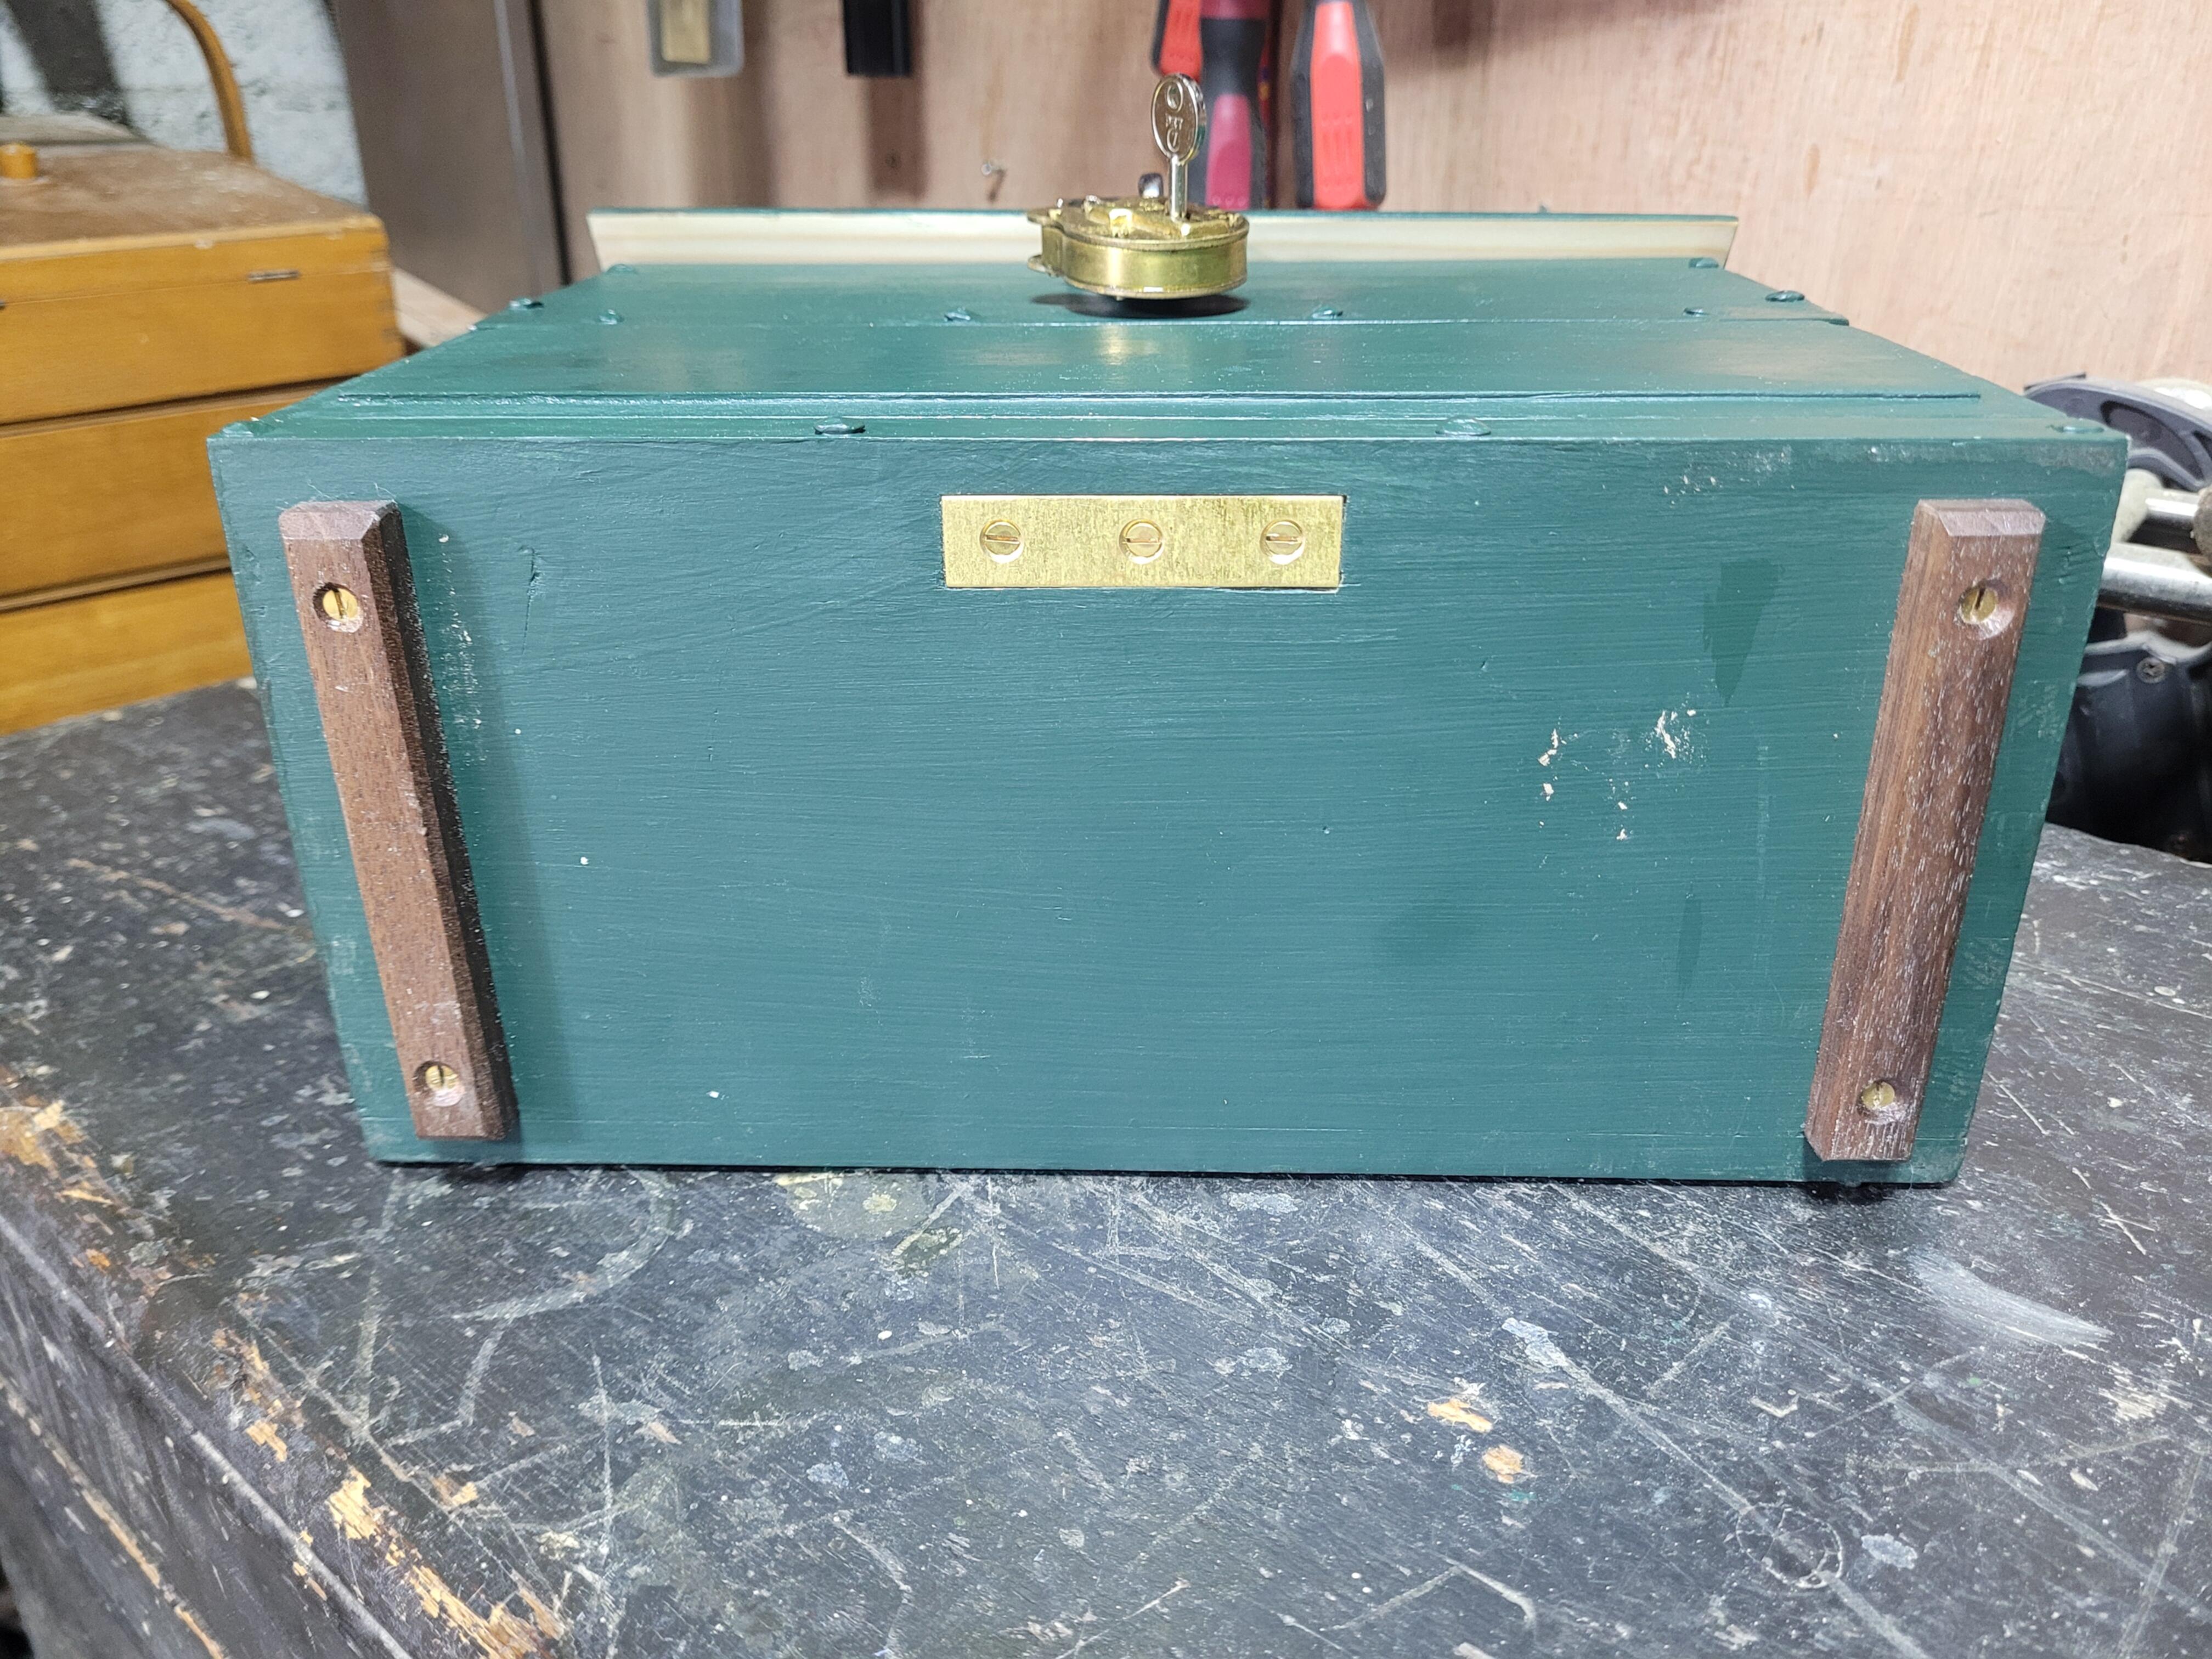
Finally the bottom of the chest. As you can see it has already picked up some bangs and scuffs from being dragged around. The two battens are known as “rot strips”. On a full size chest the keep the main body off the floor, and prevent damp from getting to them. If the rot strips rot, you just take them off and replace them.
The little brass plate is called a mending plate. It is part of Fitzpatrick’s design. Apparently many chests have over time had the locking strip of wood beat the bottom of the chest to bits. A small reinforcing plate stops that from happening. Mine is made out of half of a brass hinge. The centre screw is pretty much ornamental. I cut it very short to stop it from emerging in the slot inside.